Crea un juego de coches multijugador con PUN 2
Crear un juego multijugador en Unity es una tarea compleja, pero afortunadamente hay varias soluciones que simplifican el proceso de desarrollo.
Una de esas soluciones es la Photon Network. Específicamente, la última versión de su API llamada PUN 2 se encarga del alojamiento del servidor y te deja libre para crear un juego multijugador como quieras.
En este tutorial, mostraré cómo crear un juego de autos simple con sincronización física usando PUN 2.
Unity versión utilizada en este tutorial: Unity 2018.3.0f2 (64 bits)
Parte 1: Configuración de PUN 2
El primer paso es descargar un paquete PUN 2 desde el Asset Store. Contiene todos los scripts y archivos necesarios para la integración multijugador.
- Abra su proyecto Unity y luego vaya a Asset Store: (Ventana -> General -> AssetStore) o presione Ctrl+9
- Busque "PUN 2- Free" y luego haga clic en el primer resultado o haga clic aquí
- Importe el paquete PUN 2 una vez finalizada la descarga


- Después de importar el paquete, debe crear una ID de la aplicación Photon, esto se hace en su sitio web: https://www.photonengine.com/
- Cree una nueva cuenta (o inicie sesión en su cuenta existente)
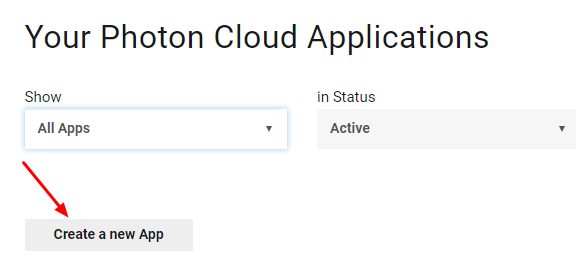
- Vaya a la página de Aplicaciones haciendo clic en el ícono de perfil y luego "Your Applications" o siga este enlace: https://dashboard.photonengine.com/en-US/PublicCloud
- En la página de Aplicaciones, haga clic en "Create new app"
- En la página de creación, para Tipo de fotón seleccione "Photon Realtime" y para Nombre, escriba cualquier nombre y luego haga clic "Create"
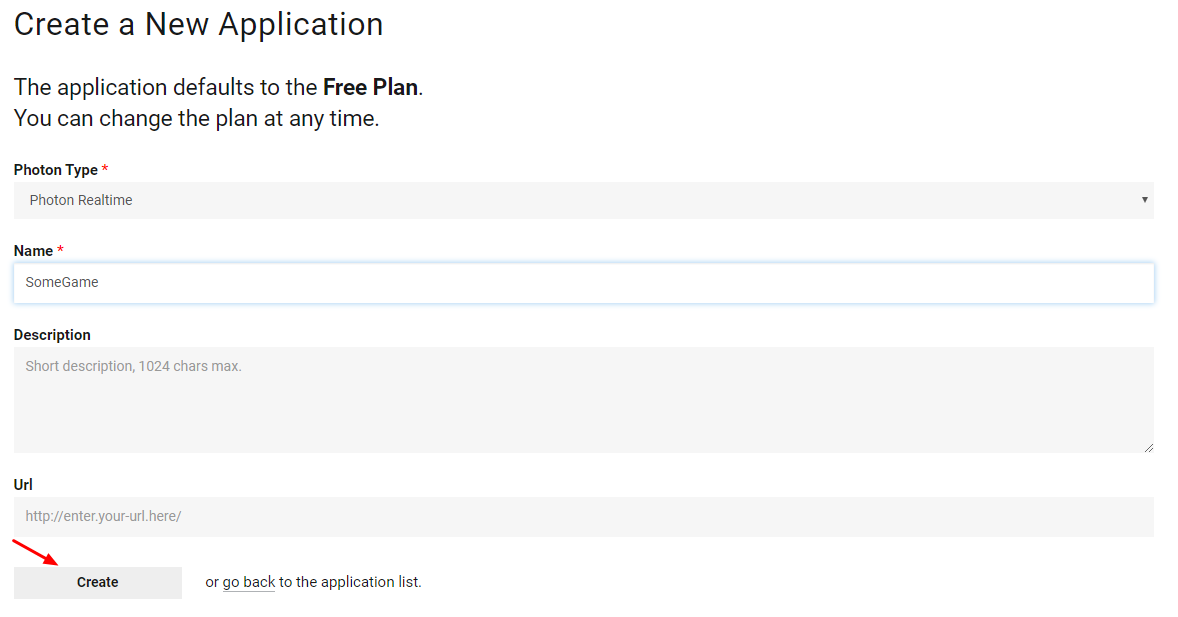
Como puede ver, la aplicación tiene por defecto el plan gratuito. Puedes leer más sobre los planes de precios aquí
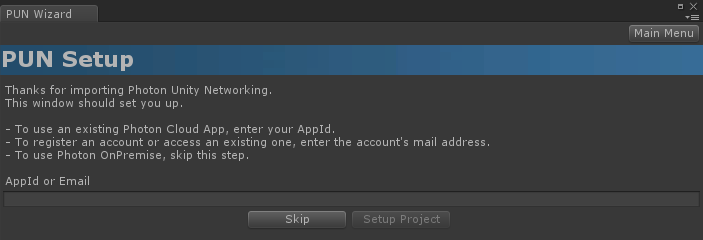
- Una vez creada la aplicación, copie el ID de la aplicación ubicado debajo del nombre de la aplicación.

- Vuelva a su proyecto Unity y luego vaya a Ventana -> Redes Photon Unity -> Asistente PUN
- En PUN Wizard, haga clic en "Setup Project", pegue su ID de aplicación y luego haga clic en "Setup Project"
¡El PUN 2 ya está listo!
Parte 2: Creación de un juego de coches multijugador
1. Configurar un vestíbulo
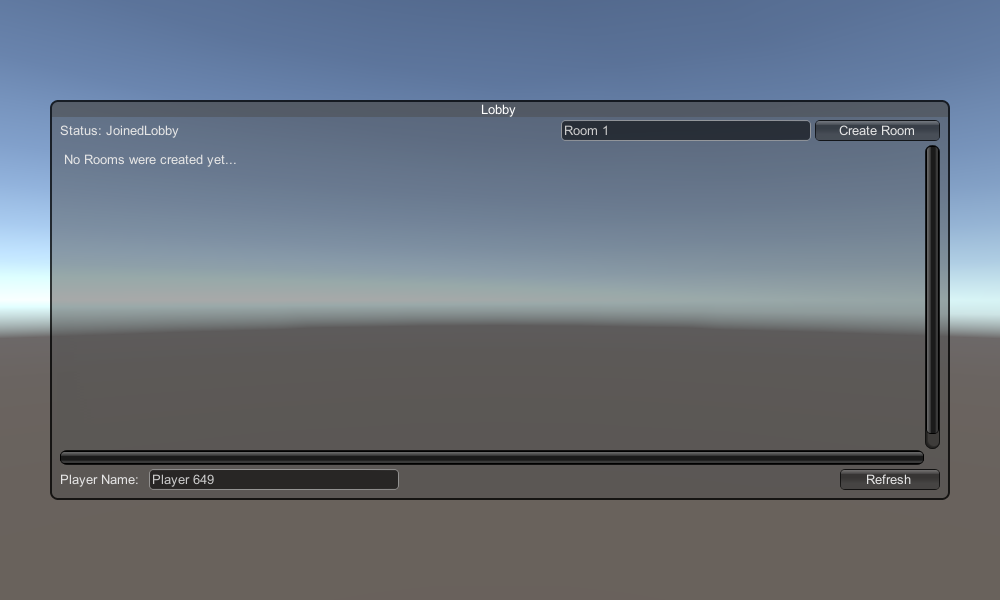
Comencemos creando una escena del lobby que contendrá la lógica del lobby (explorar salas existentes, crear salas nuevas, etc.):
- Crea una nueva escena y llámala "GameLobby"
- En la escena "GameLobby" crea un nuevo GameObject y llámalo "_GameLobby"
- Cree un nuevo script C# y llámelo "PUN2_GameLobby" y luego adjúntelo al objeto "_GameLobby"
- Pegue el siguiente código dentro del script "PUN2_GameLobby"
PUN2_GameLobby.cs
using System.Collections.Generic;
using UnityEngine;
using Photon.Pun;
using Photon.Realtime;

public class PUN2_GameLobby : MonoBehaviourPunCallbacks
{

    //Our player name
    string playerName = "Player 1";
    //Users are separated from each other by gameversion (which allows you to make breaking changes).
    string gameVersion = "1.0";
    //The list of created rooms
    List<RoomInfo> createdRooms = new List<RoomInfo>();
    //Use this name when creating a Room
    string roomName = "Room 1";
    Vector2 roomListScroll = Vector2.zero;
    bool joiningRoom = false;

    // Use this for initialization
    void Start()
    {
        //Initialize Player name
        playerName = "Player " + Random.Range(111, 999);

        //This makes sure we can use PhotonNetwork.LoadLevel() on the master client and all clients in the same room sync their level automatically
        PhotonNetwork.AutomaticallySyncScene = true;

        if (!PhotonNetwork.IsConnected)
        {
            //Set the App version before connecting
            PhotonNetwork.PhotonServerSettings.AppSettings.AppVersion = gameVersion;
            PhotonNetwork.PhotonServerSettings.AppSettings.FixedRegion = "eu";
            // Connect to the photon master-server. We use the settings saved in PhotonServerSettings (a .asset file in this project)
            PhotonNetwork.ConnectUsingSettings();
        }
    }

    public override void OnDisconnected(DisconnectCause cause)
    {
        Debug.Log("OnFailedToConnectToPhoton. StatusCode: " + cause.ToString() + " ServerAddress: " + PhotonNetwork.ServerAddress);
    }

    public override void OnConnectedToMaster()
    {
        Debug.Log("OnConnectedToMaster");
        //After we connected to Master server, join the Lobby
        PhotonNetwork.JoinLobby(TypedLobby.Default);
    }

    public override void OnRoomListUpdate(List<RoomInfo> roomList)
    {
        Debug.Log("We have received the Room list");
        //After this callback, update the room list
        createdRooms = roomList;
    }

    void OnGUI()
    {
        GUI.Window(0, new Rect(Screen.width / 2 - 450, Screen.height / 2 - 200, 900, 400), LobbyWindow, "Lobby");
    }

    void LobbyWindow(int index)
    {
        //Connection Status and Room creation Button
        GUILayout.BeginHorizontal();

        GUILayout.Label("Status: " + PhotonNetwork.NetworkClientState);

        if (joiningRoom || !PhotonNetwork.IsConnected || PhotonNetwork.NetworkClientState != ClientState.JoinedLobby)
        {
            GUI.enabled = false;
        }

        GUILayout.FlexibleSpace();

        //Room name text field
        roomName = GUILayout.TextField(roomName, GUILayout.Width(250));

        if (GUILayout.Button("Create Room", GUILayout.Width(125)))
        {
            if (roomName != "")
            {
                joiningRoom = true;

                RoomOptions roomOptions = new RoomOptions();
                roomOptions.IsOpen = true;
                roomOptions.IsVisible = true;
                roomOptions.MaxPlayers = (byte)10; //Set any number

                PhotonNetwork.JoinOrCreateRoom(roomName, roomOptions, TypedLobby.Default);
            }
        }

        GUILayout.EndHorizontal();

        //Scroll through available rooms
        roomListScroll = GUILayout.BeginScrollView(roomListScroll, true, true);

        if (createdRooms.Count == 0)
        {
            GUILayout.Label("No Rooms were created yet...");
        }
        else
        {
            for (int i = 0; i < createdRooms.Count; i++)
            {
                GUILayout.BeginHorizontal("box");
                GUILayout.Label(createdRooms[i].Name, GUILayout.Width(400));
                GUILayout.Label(createdRooms[i].PlayerCount + "/" + createdRooms[i].MaxPlayers);

                GUILayout.FlexibleSpace();

                if (GUILayout.Button("Join Room"))
                {
                    joiningRoom = true;

                    //Set our Player name
                    PhotonNetwork.NickName = playerName;

                    //Join the Room
                    PhotonNetwork.JoinRoom(createdRooms[i].Name);
                }
                GUILayout.EndHorizontal();
            }
        }

        GUILayout.EndScrollView();

        //Set player name and Refresh Room button
        GUILayout.BeginHorizontal();

        GUILayout.Label("Player Name: ", GUILayout.Width(85));
        //Player name text field
        playerName = GUILayout.TextField(playerName, GUILayout.Width(250));

        GUILayout.FlexibleSpace();

        GUI.enabled = (PhotonNetwork.NetworkClientState == ClientState.JoinedLobby || PhotonNetwork.NetworkClientState == ClientState.Disconnected) && !joiningRoom;
        if (GUILayout.Button("Refresh", GUILayout.Width(100)))
        {
            if (PhotonNetwork.IsConnected)
            {
                //Re-join Lobby to get the latest Room list
                PhotonNetwork.JoinLobby(TypedLobby.Default);
            }
            else
            {
                //We are not connected, estabilish a new connection
                PhotonNetwork.ConnectUsingSettings();
            }
        }

        GUILayout.EndHorizontal();

        if (joiningRoom)
        {
            GUI.enabled = true;
            GUI.Label(new Rect(900 / 2 - 50, 400 / 2 - 10, 100, 20), "Connecting...");
        }
    }

    public override void OnCreateRoomFailed(short returnCode, string message)
    {
        Debug.Log("OnCreateRoomFailed got called. This can happen if the room exists (even if not visible). Try another room name.");
        joiningRoom = false;
    }

    public override void OnJoinRoomFailed(short returnCode, string message)
    {
        Debug.Log("OnJoinRoomFailed got called. This can happen if the room is not existing or full or closed.");
        joiningRoom = false;
    }

    public override void OnJoinRandomFailed(short returnCode, string message)
    {
        Debug.Log("OnJoinRandomFailed got called. This can happen if the room is not existing or full or closed.");
        joiningRoom = false;
    }

    public override void OnCreatedRoom()
    {
        Debug.Log("OnCreatedRoom");
        //Set our player name
        PhotonNetwork.NickName = playerName;
        //Load the Scene called Playground (Make sure it's added to build settings)
        PhotonNetwork.LoadLevel("Playground");
    }

    public override void OnJoinedRoom()
    {
        Debug.Log("OnJoinedRoom");
    }
}
2. Crear una casa prefabricada para un automóvil
La casa prefabricada Car utilizará un controlador físico simple.
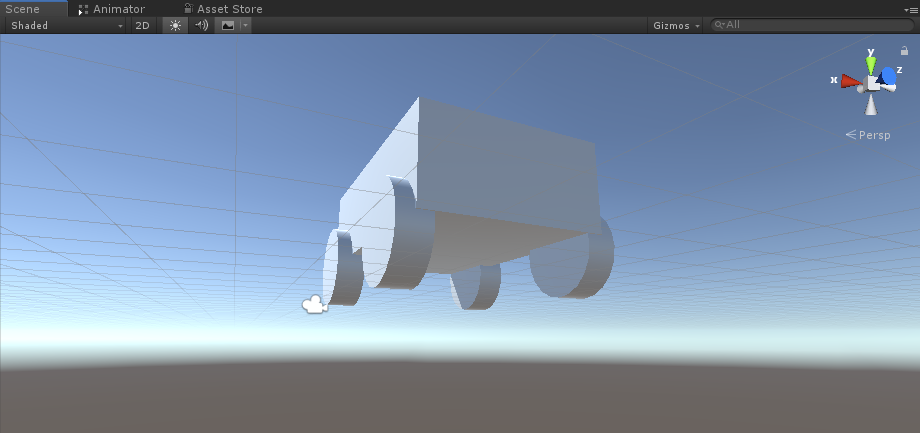
- Crea un nuevo GameObject y llámalo "CarRoot"
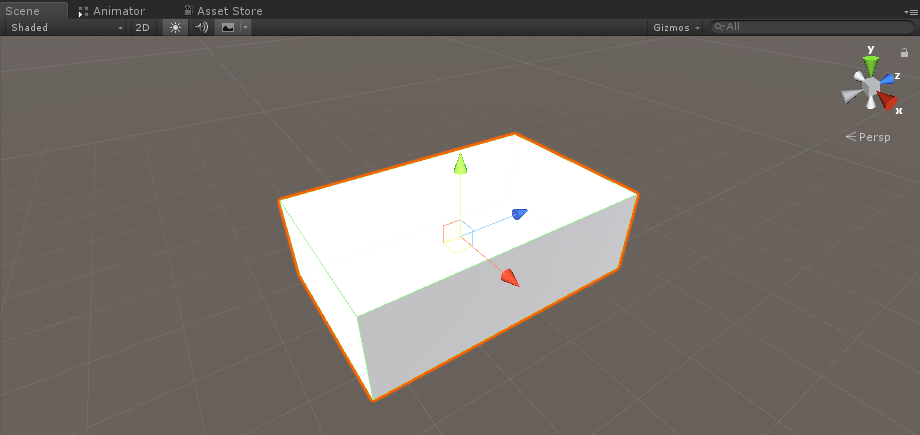
- Cree un nuevo cubo y muévalo dentro del objeto "CarRoot" y luego amplíelo a lo largo de los ejes Z y X.
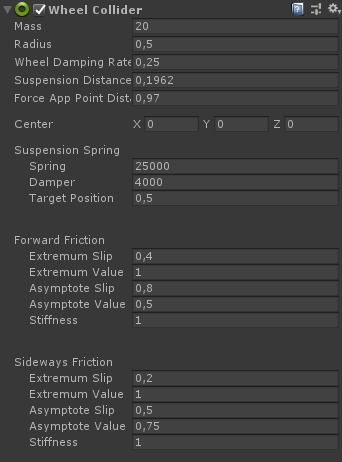
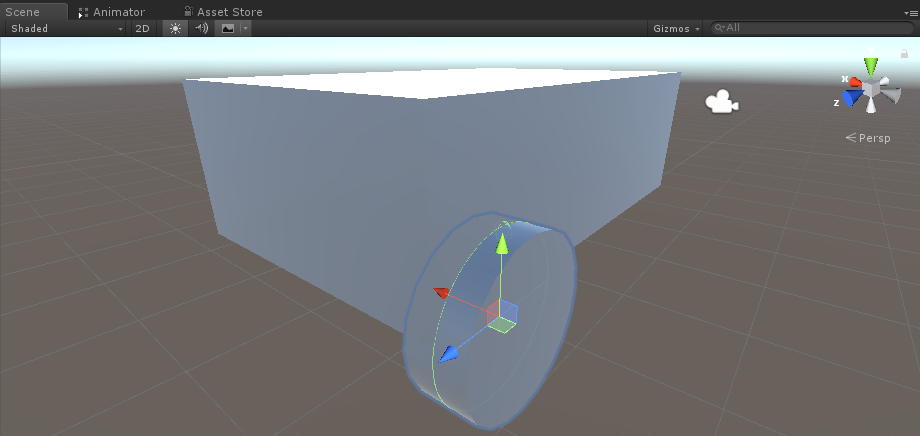
- Crea un nuevo GameObject y llámalo "wfl" (abreviatura de Wheel Front Left)
- Agregue el componente Wheel Collider al objeto "wfl" y establezca los valores de la imagen a continuación:
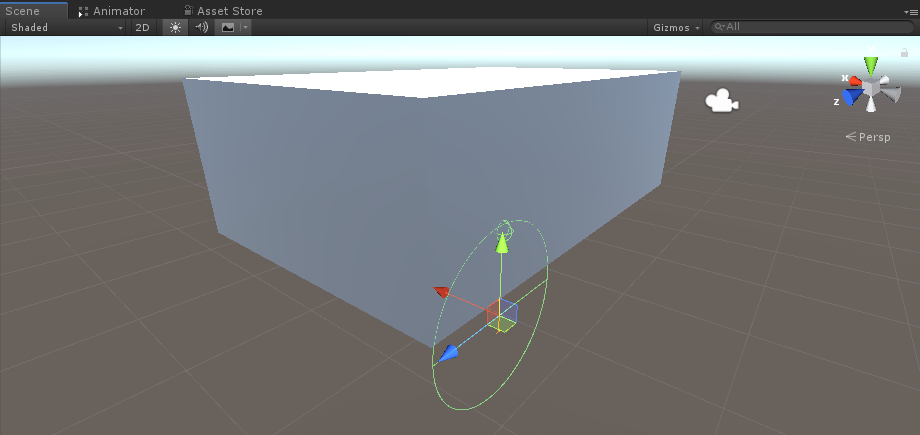
- Crea un nuevo GameObject, cámbiale el nombre a "WheelTransform" y luego muévelo dentro del objeto "wfl"
- Cree un nuevo Cilindro, muévalo dentro del objeto "WheelTransform", luego gírelo y escale hasta que coincida con las dimensiones del Wheel Collider. En mi caso, la escala es (1, 0,17, 1)
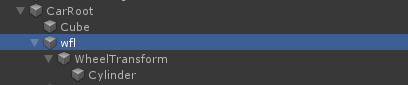
- Finalmente, duplique el objeto "wfl" 3 veces para el resto de las ruedas y cambie el nombre de cada objeto a "wfr" (Rueda delantera derecha), "wrr" (Rueda trasera derecha) y "wrl" (Rueda trasera izquierda) respectivamente.
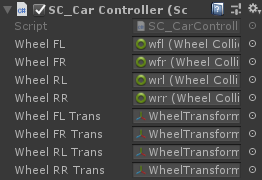
- Cree un nuevo script, llámelo "SC_CarController" y luego pegue el siguiente código dentro de él:
SC_CarController.cs
using UnityEngine;
using System.Collections;

public class SC_CarController : MonoBehaviour
{
    public WheelCollider WheelFL;
    public WheelCollider WheelFR;
    public WheelCollider WheelRL;
    public WheelCollider WheelRR;
    public Transform WheelFLTrans;
    public Transform WheelFRTrans;
    public Transform WheelRLTrans;
    public Transform WheelRRTrans;
    public float steeringAngle = 45;
    public float maxTorque = 1000;
    public  float maxBrakeTorque = 500;
    public Transform centerOfMass;

    float gravity = 9.8f;
    bool braked = false;
    Rigidbody rb;

    void Start()
    {
        rb = GetComponent<Rigidbody>();
        rb.centerOfMass = centerOfMass.transform.localPosition;
    }

    void FixedUpdate()
    {
        if (!braked)
        {
            WheelFL.brakeTorque = 0;
            WheelFR.brakeTorque = 0;
            WheelRL.brakeTorque = 0;
            WheelRR.brakeTorque = 0;
        }
        //Speed of car, Car will move as you will provide the input to it.

        WheelRR.motorTorque = maxTorque * Input.GetAxis("Vertical");
        WheelRL.motorTorque = maxTorque * Input.GetAxis("Vertical");

        //Changing car direction
        //Here we are changing the steer angle of the front tyres of the car so that we can change the car direction.
        WheelFL.steerAngle = steeringAngle * Input.GetAxis("Horizontal");
        WheelFR.steerAngle = steeringAngle * Input.GetAxis("Horizontal");
    }
    void Update()
    {
        HandBrake();

        //For tyre rotate
        WheelFLTrans.Rotate(WheelFL.rpm / 60 * 360 * Time.deltaTime, 0, 0);
        WheelFRTrans.Rotate(WheelFR.rpm / 60 * 360 * Time.deltaTime, 0, 0);
        WheelRLTrans.Rotate(WheelRL.rpm / 60 * 360 * Time.deltaTime, 0, 0);
        WheelRRTrans.Rotate(WheelRL.rpm / 60 * 360 * Time.deltaTime, 0, 0);
        //Changing tyre direction
        Vector3 temp = WheelFLTrans.localEulerAngles;
        Vector3 temp1 = WheelFRTrans.localEulerAngles;
        temp.y = WheelFL.steerAngle - (WheelFLTrans.localEulerAngles.z);
        WheelFLTrans.localEulerAngles = temp;
        temp1.y = WheelFR.steerAngle - WheelFRTrans.localEulerAngles.z;
        WheelFRTrans.localEulerAngles = temp1;
    }
    void HandBrake()
    {
        //Debug.Log("brakes " + braked);
        if (Input.GetButton("Jump"))
        {
            braked = true;
        }
        else
        {
            braked = false;
        }
        if (braked)
        {

            WheelRL.brakeTorque = maxBrakeTorque * 20;//0000;
            WheelRR.brakeTorque = maxBrakeTorque * 20;//0000;
            WheelRL.motorTorque = 0;
            WheelRR.motorTorque = 0;
        }
    }
}- Adjunte el script SC_CarController al objeto "CarRoot"
- Adjunte el componente Rigidbody al objeto "CarRoot" y cambie su masa a 1000
- Asigne las variables de la rueda en SC_CarController (Wheel Collider para las primeras 4 variables y WheelTransform para el resto de las 4)
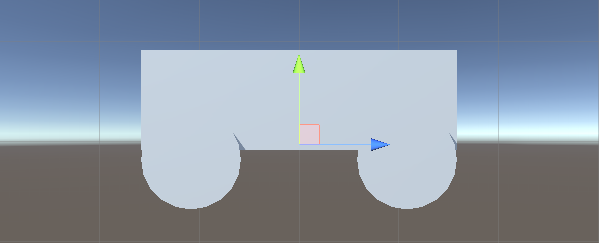
- Para la variable Centro de masa, cree un nuevo GameObject, llámelo "CenterOfMass" y muévalo dentro del objeto "CarRoot"
- Coloque el objeto "CenterOfMass" en el medio y ligeramente hacia abajo, así:
- Finalmente, para fines de prueba, mueva la cámara principal dentro del objeto "CarRoot" y apúntela hacia el automóvil:

- Cree un nuevo script, llámelo "PUN2_CarSync" y luego pegue el siguiente código dentro de él:
PUN2_CarSync.cs
using System.Collections;
using System.Collections.Generic;
using UnityEngine;
using Photon.Pun;

public class PUN2_CarSync : MonoBehaviourPun, IPunObservable
{
    public MonoBehaviour[] localScripts; //Scripts that should only be enabled for the local player (Ex. Car controller)
    public GameObject[] localObjects; //Objects that should only be active for the local player (Ex. Camera)
    public Transform[] wheels; //Car wheel transforms

    Rigidbody r;
    // Values that will be synced over network
    Vector3 latestPos;
    Quaternion latestRot;
    Vector3 latestVelocity;
    Vector3 latestAngularVelocity;
    Quaternion[] wheelRotations = new Quaternion[0];
    // Lag compensation
    float currentTime = 0;
    double currentPacketTime = 0;
    double lastPacketTime = 0;
    Vector3 positionAtLastPacket = Vector3.zero;
    Quaternion rotationAtLastPacket = Quaternion.identity;
    Vector3 velocityAtLastPacket = Vector3.zero;
    Vector3 angularVelocityAtLastPacket = Vector3.zero;

    // Use this for initialization
    void Awake()
    {
        r = GetComponent<Rigidbody>();
        r.isKinematic = !photonView.IsMine;
        for (int i = 0; i < localScripts.Length; i++)
        {
            localScripts[i].enabled = photonView.IsMine;
        }
        for (int i = 0; i < localObjects.Length; i++)
        {
            localObjects[i].SetActive(photonView.IsMine);
        }
    }

    public void OnPhotonSerializeView(PhotonStream stream, PhotonMessageInfo info)
    {
        if (stream.IsWriting)
        {
            // We own this player: send the others our data
            stream.SendNext(transform.position);
            stream.SendNext(transform.rotation);
            stream.SendNext(r.velocity);
            stream.SendNext(r.angularVelocity);

            wheelRotations = new Quaternion[wheels.Length];
            for(int i = 0; i < wheels.Length; i++)
            {
                wheelRotations[i] = wheels[i].localRotation;
            }
            stream.SendNext(wheelRotations);
        }
        else
        {
            // Network player, receive data
            latestPos = (Vector3)stream.ReceiveNext();
            latestRot = (Quaternion)stream.ReceiveNext();
            latestVelocity = (Vector3)stream.ReceiveNext();
            latestAngularVelocity = (Vector3)stream.ReceiveNext();
            wheelRotations = (Quaternion[])stream.ReceiveNext();

            // Lag compensation
            currentTime = 0.0f;
            lastPacketTime = currentPacketTime;
            currentPacketTime = info.SentServerTime;
            positionAtLastPacket = transform.position;
            rotationAtLastPacket = transform.rotation;
            velocityAtLastPacket = r.velocity;
            angularVelocityAtLastPacket = r.angularVelocity;
        }
    }

    // Update is called once per frame
    void Update()
    {
        if (!photonView.IsMine)
        {
            // Lag compensation
            double timeToReachGoal = currentPacketTime - lastPacketTime;
            currentTime += Time.deltaTime;

            // Update car position and velocity
            transform.position = Vector3.Lerp(positionAtLastPacket, latestPos, (float)(currentTime / timeToReachGoal));
            transform.rotation = Quaternion.Lerp(rotationAtLastPacket, latestRot, (float)(currentTime / timeToReachGoal));
            r.velocity = Vector3.Lerp(velocityAtLastPacket, latestVelocity, (float)(currentTime / timeToReachGoal));
            r.angularVelocity = Vector3.Lerp(angularVelocityAtLastPacket, latestAngularVelocity, (float)(currentTime / timeToReachGoal));

            //Apply wheel rotation
            if(wheelRotations.Length == wheels.Length)
            {
                for (int i = 0; i < wheelRotations.Length; i++)
                {
                    wheels[i].localRotation = Quaternion.Lerp(wheels[i].localRotation, wheelRotations[i], Time.deltaTime * 6.5f);
                }
            }
        }
    }
}- Adjunte el script PUN2_CarSync al objeto "CarRoot"
- Adjunte el componente PhotonView al objeto "CarRoot"
- En PUN2_CarSync asigne el script SC_CarController a la matriz de scripts locales
- En PUN2_CarSync asigne la cámara a la matriz de objetos locales
- Asignar objetos WheelTransform a la matriz Wheels
- Finalmente, asigne el script PUN2_CarSync a la matriz de componentes observados en Photon View.
- Guarde el objeto "CarRoot" en Prefab y colóquelo en una carpeta llamada Recursos (esto es necesario para poder generar objetos en la red)
3. Creando un nivel de juego
El nivel de juego es una escena que se carga después de unirse a la sala, donde ocurre toda la acción.
- Cree una nueva escena y llámela "Playground" (O si desea mantener un nombre diferente, asegúrese de cambiar el nombre en esta línea PhotonNetwork.LoadLevel("Playground"); en PUN2_GameLobby.cs).
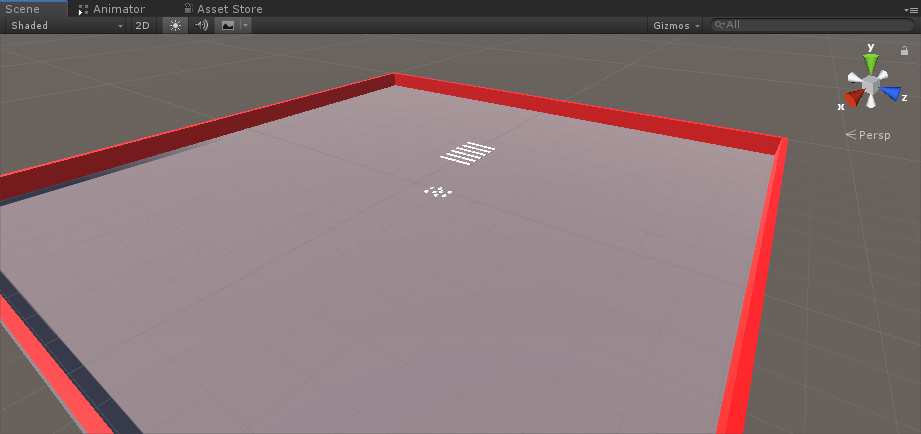
En mi caso, usaré una escena sencilla con un avión y algunos cubos:
- Cree un nuevo script y llámelo PUN2_RoomController (este script manejará la lógica dentro de la Sala, como generar jugadores, mostrar la lista de jugadores, etc.) luego pegue el siguiente código dentro de él:
PUN2_RoomController.cs
using UnityEngine;
using Photon.Pun;

public class PUN2_RoomController : MonoBehaviourPunCallbacks
{

    //Player instance prefab, must be located in the Resources folder
    public GameObject playerPrefab;
    //Player spawn point
    public Transform[] spawnPoints;

    // Use this for initialization
    void Start()
    {
        //In case we started this demo with the wrong scene being active, simply load the menu scene
        if (PhotonNetwork.CurrentRoom == null)
        {
            Debug.Log("Is not in the room, returning back to Lobby");
            UnityEngine.SceneManagement.SceneManager.LoadScene("GameLobby");
            return;
        }

        //We're in a room. spawn a character for the local player. it gets synced by using PhotonNetwork.Instantiate
        PhotonNetwork.Instantiate(playerPrefab.name, spawnPoints[Random.Range(0, spawnPoints.Length - 1)].position, spawnPoints[Random.Range(0, spawnPoints.Length - 1)].rotation, 0);
    }

    void OnGUI()
    {
        if (PhotonNetwork.CurrentRoom == null)
            return;

        //Leave this Room
        if (GUI.Button(new Rect(5, 5, 125, 25), "Leave Room"))
        {
            PhotonNetwork.LeaveRoom();
        }

        //Show the Room name
        GUI.Label(new Rect(135, 5, 200, 25), PhotonNetwork.CurrentRoom.Name);

        //Show the list of the players connected to this Room
        for (int i = 0; i < PhotonNetwork.PlayerList.Length; i++)
        {
            //Show if this player is a Master Client. There can only be one Master Client per Room so use this to define the authoritative logic etc.)
            string isMasterClient = (PhotonNetwork.PlayerList[i].IsMasterClient ? ": MasterClient" : "");
            GUI.Label(new Rect(5, 35 + 30 * i, 200, 25), PhotonNetwork.PlayerList[i].NickName + isMasterClient);
        }
    }

    public override void OnLeftRoom()
    {
        //We have left the Room, return back to the GameLobby
        UnityEngine.SceneManagement.SceneManager.LoadScene("GameLobby");
    }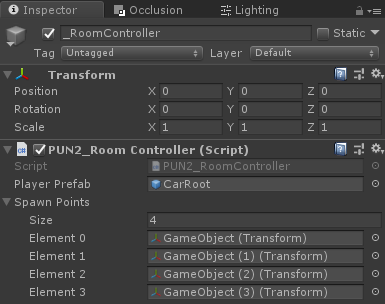
}- Crea un nuevo GameObject en la escena "Playground" y llámalo "_RoomController"
- Adjunte un script PUN2_RoomController al objeto _RoomController
- Asigne una casa prefabricada de automóvil y puntos de generación y luego guarde la escena.
- Agregue escenas de GameLobby y Playground a la configuración de compilación:

4. Hacer una compilación de prueba
Ahora es el momento de crear una compilación y probarla:
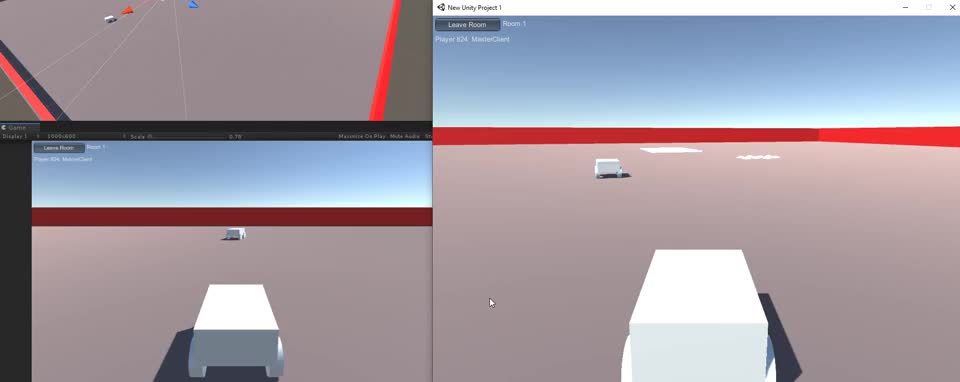
¡Todo funciona como se esperaba!