Tutorial del controlador de jugador de arriba hacia abajo para Unity
Mucha gente está familiarizada con géneros de juegos como FPS (First-Person Shooter) y RTS (Estrategia en tiempo real), pero también hay muchos juegos que no entran en una sola categoría específica. Uno de esos juegos es Top-Down Shooter.
Top-Down Shooter es un juego en el que el jugador es controlado desde una perspectiva de vista superior.
Ejemplos de juegos de disparos de arriba hacia abajo son Hotline Miami, Hotline Miami 2, Original Grand Theft Auto, etc.

Para crear un controlador de personaje de arriba hacia abajo en Unity, sigue los pasos a continuación.
Paso 1: crear los guiones
Para este tutorial, solo necesitaremos un script.
- Cree un nuevo script, asígnele el nombre SC_TopDownController, elimine todo lo que contiene y pegue el siguiente código dentro de él:
SC_TopDownController.cs
using UnityEngine;

[RequireComponent(typeof(Rigidbody))]
[RequireComponent(typeof(CapsuleCollider))]

public class SC_TopDownController : MonoBehaviour
{
    //Player Camera variables
    public enum CameraDirection { x, z }
    public CameraDirection cameraDirection = CameraDirection.x;
    public float cameraHeight = 20f;
    public float cameraDistance = 7f;
    public Camera playerCamera;
    public GameObject targetIndicatorPrefab;
    //Player Controller variables
    public float speed = 5.0f;
    public float gravity = 14.0f;
    public float maxVelocityChange = 10.0f;
    public bool canJump = true;
    public float jumpHeight = 2.0f;
    //Private variables
    bool grounded = false;
    Rigidbody r;
    GameObject targetObject;
    //Mouse cursor Camera offset effect
    Vector2 playerPosOnScreen;
    Vector2 cursorPosition;
    Vector2 offsetVector;
    //Plane that represents imaginary floor that will be used to calculate Aim target position
    Plane surfacePlane = new Plane();

    void Awake()
    {
        r = GetComponent<Rigidbody>();
        r.freezeRotation = true;
        r.useGravity = false;

        //Instantiate aim target prefab
        if (targetIndicatorPrefab)
        {
            targetObject = Instantiate(targetIndicatorPrefab, Vector3.zero, Quaternion.identity) as GameObject;
        }

        //Hide the cursor
        Cursor.visible = false;
    }

    void FixedUpdate()
    {
        //Setup camera offset
        Vector3 cameraOffset = Vector3.zero;
        if (cameraDirection == CameraDirection.x)
        {
            cameraOffset = new Vector3(cameraDistance, cameraHeight, 0);
        }
        else if (cameraDirection == CameraDirection.z)
        {
            cameraOffset = new Vector3(0, cameraHeight, cameraDistance);
        }

        if (grounded)
        {
            Vector3 targetVelocity = Vector3.zero;
            // Calculate how fast we should be moving
            if (cameraDirection == CameraDirection.x)
            {
                targetVelocity = new Vector3(Input.GetAxis("Vertical") * (cameraDistance >= 0 ? -1 : 1), 0, Input.GetAxis("Horizontal") * (cameraDistance >= 0 ? 1 : -1));
            }
            else if (cameraDirection == CameraDirection.z)
            {
                targetVelocity = new Vector3(Input.GetAxis("Horizontal") * (cameraDistance >= 0 ? -1 : 1), 0, Input.GetAxis("Vertical") * (cameraDistance >= 0 ? -1 : 1));
            }
            targetVelocity *= speed;

            // Apply a force that attempts to reach our target velocity
            Vector3 velocity = r.velocity;
            Vector3 velocityChange = (targetVelocity - velocity);
            velocityChange.x = Mathf.Clamp(velocityChange.x, -maxVelocityChange, maxVelocityChange);
            velocityChange.z = Mathf.Clamp(velocityChange.z, -maxVelocityChange, maxVelocityChange);
            velocityChange.y = 0;
            r.AddForce(velocityChange, ForceMode.VelocityChange);

            // Jump
            if (canJump && Input.GetButton("Jump"))
            {
                r.velocity = new Vector3(velocity.x, CalculateJumpVerticalSpeed(), velocity.z);
            }
        }

        // We apply gravity manually for more tuning control
        r.AddForce(new Vector3(0, -gravity * r.mass, 0));

        grounded = false;

        //Mouse cursor offset effect
        playerPosOnScreen = playerCamera.WorldToViewportPoint(transform.position);
        cursorPosition = playerCamera.ScreenToViewportPoint(Input.mousePosition);
        offsetVector = cursorPosition - playerPosOnScreen;

        //Camera follow
        playerCamera.transform.position = Vector3.Lerp(playerCamera.transform.position, transform.position + cameraOffset, Time.deltaTime * 7.4f);
        playerCamera.transform.LookAt(transform.position + new Vector3(-offsetVector.y * 2, 0, offsetVector.x * 2));

        //Aim target position and rotation
        targetObject.transform.position = GetAimTargetPos();
        targetObject.transform.LookAt(new Vector3(transform.position.x, targetObject.transform.position.y, transform.position.z));

        //Player rotation
        transform.LookAt(new Vector3(targetObject.transform.position.x, transform.position.y, targetObject.transform.position.z));
    }

    Vector3 GetAimTargetPos()
    {
        //Update surface plane
        surfacePlane.SetNormalAndPosition(Vector3.up, transform.position);

        //Create a ray from the Mouse click position
        Ray ray = playerCamera.ScreenPointToRay(Input.mousePosition);

        //Initialise the enter variable
        float enter = 0.0f;

        if (surfacePlane.Raycast(ray, out enter))
        {
            //Get the point that is clicked
            Vector3 hitPoint = ray.GetPoint(enter);

            //Move your cube GameObject to the point where you clicked
            return hitPoint;
        }

        //No raycast hit, hide the aim target by moving it far away
        return new Vector3(-5000, -5000, -5000);
    }

    void OnCollisionStay()
    {
        grounded = true;
    }

    float CalculateJumpVerticalSpeed()
    {
        // From the jump height and gravity we deduce the upwards speed
        // for the character to reach at the apex.
        return Mathf.Sqrt(2 * jumpHeight * gravity);
    }
}![]()
Paso 2: crea el sombreador
Este tutorial también requiere un sombreador personalizado, que es necesario para hacer que el objetivo del objetivo se superponga al resto de los objetos (siempre en la parte superior).
- Haga clic derecho en la vista Proyecto -> Crear -> Sombreador -> Sombreador de superficie estándar
- Nombra el sombreador "Cursor"
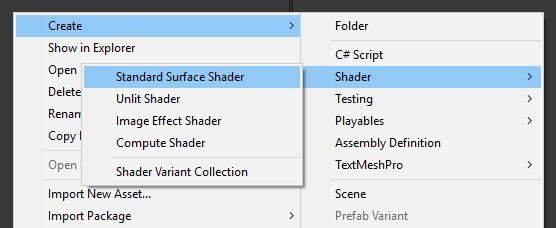
- Abra el sombreador, elimine todo lo que contiene y luego pegue el siguiente código:
Cursor.sombreador
Shader "Custom/FX/Cursor" {
	Properties {
		_MainTex ("Base", 2D) = "white" {}
	}

	CGINCLUDE

		#include "UnityCG.cginc"

		sampler2D _MainTex;

		half4 _MainTex_ST;

		struct v2f {
			half4 pos : SV_POSITION;
			half2 uv : TEXCOORD0;
		};

		v2f vert(appdata_full v) {
			v2f o;

			o.pos = UnityObjectToClipPos (v.vertex);
			o.uv.xy = TRANSFORM_TEX(v.texcoord, _MainTex);

			return o;
		}

		fixed4 frag( v2f i ) : COLOR {
			return tex2D (_MainTex, i.uv.xy);
		}

	ENDCG

	SubShader {
		Tags { "RenderType" = "Transparent" "Queue" = "Transparent+100"}
		Cull Off
		Lighting Off
		ZWrite Off
		ZTest Always
		Fog { Mode Off }
		Blend SrcAlpha OneMinusSrcAlpha

	Pass {

		CGPROGRAM

		#pragma vertex vert
		#pragma fragment frag
		#pragma fragmentoption ARB_precision_hint_fastest

		ENDCG

		}

	}
	FallBack Off
}![]()
Paso 3: configurar el controlador de personajes de arriba hacia abajo
Configuremos un controlador de personajes de arriba hacia abajo:
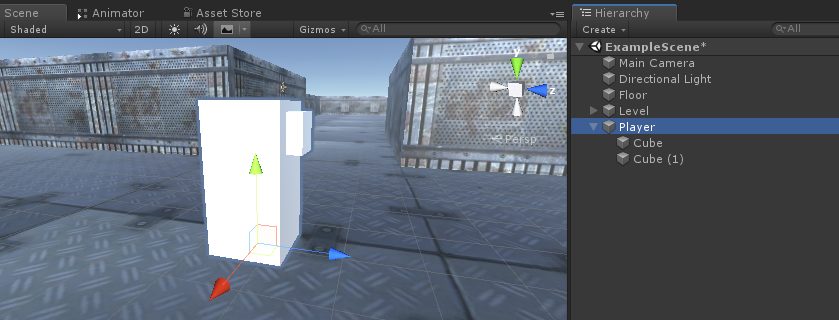
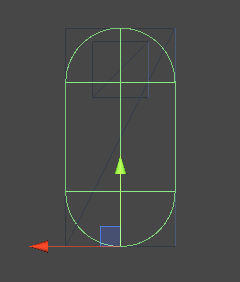
- Crea un nuevo GameObject y llámalo "Player"
- Crea un nuevo Cubo y escale (En mi caso la escala es (1, 2, 1))
- Crea un segundo Cubo, escalalo mucho más pequeño y muévelo a un área superior (Esto es simplemente para saber en qué dirección está mirando el jugador)
- Mueva ambos cubos dentro del objeto "Player" y elimine sus componentes BoxCollider
Ahora, antes de continuar, creemos el objetivo prefabricado Aim:
- Crea un nuevo GameObject y llámalo "AimTarget"
- Crea un nuevo Quad (GameObject -> Objeto 3D -> Quad) y muévelo dentro del Objeto "AimTarget"
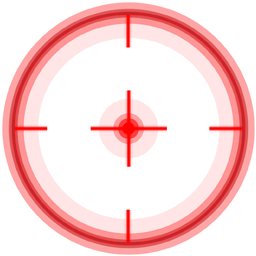
- Asigne la textura siguiente a un quad y cambie el sombreador de materiales a 'Custom/FX/Cursor'
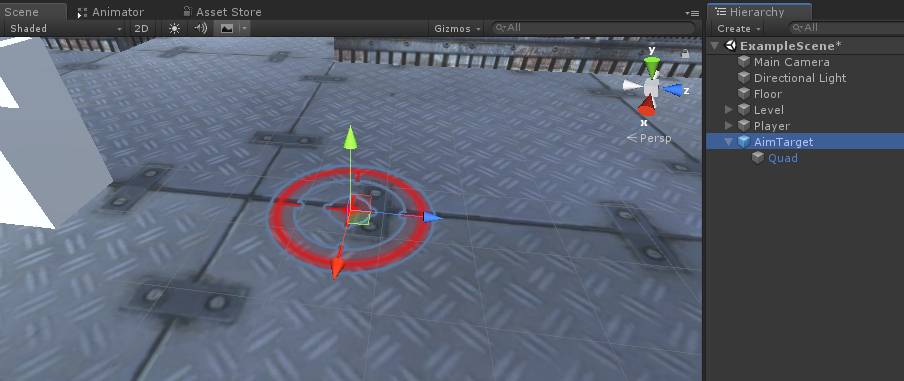
- Guarde el "AimTarget" en Prefab y elimínelo de Scene
![]()
Volver a la instancia del Jugador:
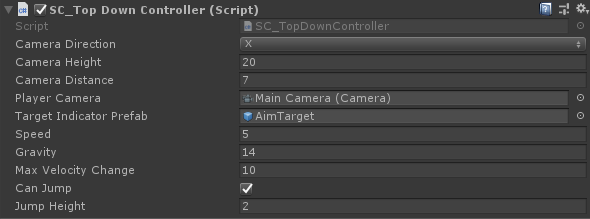
- Adjunte el script SC_TopDownController al objeto "Player" (notará que agregó algunos componentes adicionales como Rigidbody y CapsuleCollider)
- Escale el CapsuleCollider hasta que coincida con el modelo del jugador (en mi caso, la Altura se establece en 2 y el Centro se establece en (0, 1, 0)
- Y finalmente, asigna las variables "Player Camera" y "Target Indicator Prefab" en SC_TopDownController
La instancia de Player ya está lista, probémosla:
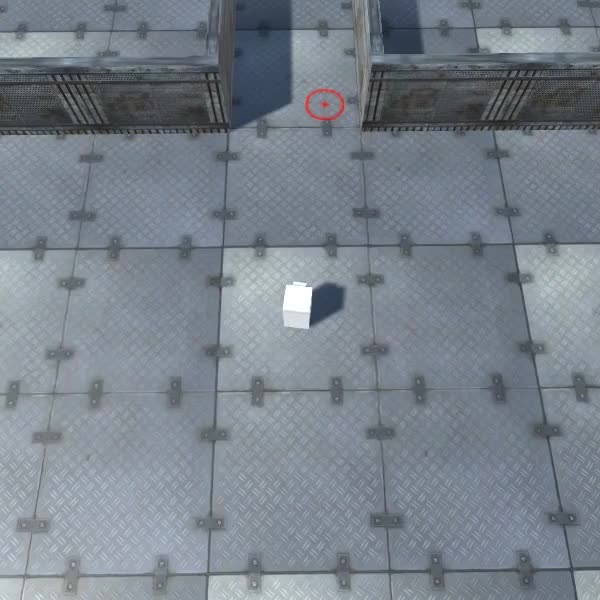
Todo funciona como se esperaba.