Unity Cómo hacer controles táctiles móviles
Los controles son una de las partes más importantes de un videojuego y, como era de esperar, es lo que permite a los jugadores interactuar con el mundo del juego.
Los controles del juego son señales que se envían a través de la interacción del hardware (ratón/teclado, controlador, pantalla táctil, etc.) que luego son procesadas por el código del juego, aplicando ciertas acciones.
Las PC y Consolas de juegos tienen botones físicos que se pueden presionar, sin embargo, los dispositivos móviles modernos solo tienen unos pocos botones físicos, el resto de la interacción se realiza a través de gestos táctiles, lo que significa que los botones del juego deben mostrarse en la pantalla. Por eso, al crear un juego móvil, es importante encontrar un equilibrio entre tener todos los botones en la pantalla y al mismo tiempo mantenerlo fácil de usar y ordenado.

En este tutorial, mostraré cómo crear controles móviles con todas las funciones (joysticks y botones) en Unity usando UI Canvas.
Paso 1: cree todos los scripts necesarios
Este tutorial incluye 2 scripts, SC_ClickTracker.cs y SC_MobileControls.cs. El primer script escuchará los eventos de clic y el segundo script leerá los valores generados a partir de los eventos.
SC_ClickTracker.cs
using System.Collections;
using System.Collections.Generic;
using UnityEngine;
using UnityEngine.EventSystems;

#if UNITY_EDITOR
using UnityEditor;
#endif

public class SC_ClickTracker : MonoBehaviour, IPointerDownHandler, IDragHandler, IPointerUpHandler
{
    public string buttonName = ""; //This should be an unique name of the button
    public bool isJoystick = false;
    public float movementLimit = 1; //How far the joystick can be moved (n x Joystick Width)
    public float movementThreshold = 0.1f; //Minimum distance (n x Joystick Width) that the Joystick need to be moved to trigger inputAxis (Must be less than movementLimit)

    //Reference variables
    RectTransform rt;
    Vector3 startPos;
    Vector2 clickPos;

    //Input variables
    Vector2 inputAxis = Vector2.zero;
    bool holding = false;
    bool clicked = false;

    void Start()
    {
        //Add this button to the list
        SC_MobileControls.instance.AddButton(this);

        rt = GetComponent<RectTransform>();
        startPos = rt.anchoredPosition3D;
    }

    //Do this when the mouse is clicked over the selectable object this script is attached to.
    public void OnPointerDown(PointerEventData eventData)
    {
        //Debug.Log(this.gameObject.name + " Was Clicked.");

        holding = true;

        if (!isJoystick)
        {
            clicked = true;
            StartCoroutine(StopClickEvent());
        }
        else
        {
            //Initialize Joystick movement
            clickPos = eventData.pressPosition;
        }
    }

    WaitForEndOfFrame waitForEndOfFrame = new WaitForEndOfFrame();

    //Wait for next update then release the click event
    IEnumerator StopClickEvent()
    {
        yield return waitForEndOfFrame;

        clicked = false;
    }

    //Joystick movement
    public void OnDrag(PointerEventData eventData)
    {
        //Debug.Log(this.gameObject.name + " The element is being dragged");

        if (isJoystick)
        {
            Vector3 movementVector = Vector3.ClampMagnitude((eventData.position - clickPos) / SC_MobileControls.instance.canvas.scaleFactor, (rt.sizeDelta.x * movementLimit) + (rt.sizeDelta.x * movementThreshold));
            Vector3 movePos = startPos + movementVector;
            rt.anchoredPosition = movePos;

            //Update inputAxis
            float inputX = 0;
            float inputY = 0;
            if (Mathf.Abs(movementVector.x) > rt.sizeDelta.x * movementThreshold)
            {
                inputX = (movementVector.x - (rt.sizeDelta.x * movementThreshold * (movementVector.x > 0 ? 1 : -1))) / (rt.sizeDelta.x * movementLimit);
            }
            if (Mathf.Abs(movementVector.y) > rt.sizeDelta.x * movementThreshold)
            {
                inputY = (movementVector.y - (rt.sizeDelta.x * movementThreshold * (movementVector.y > 0 ? 1 : -1))) / (rt.sizeDelta.x * movementLimit);
            }
            inputAxis = new Vector2(inputX, inputY);
        }
    }

    //Do this when the mouse click on this selectable UI object is released.
    public void OnPointerUp(PointerEventData eventData)
    {
        //Debug.Log(this.gameObject.name + " The mouse click was released");

        holding = false;

        if (isJoystick)
        {
            //Reset Joystick position
            rt.anchoredPosition = startPos;
            inputAxis = Vector2.zero;
        }
    }

    public Vector2 GetInputAxis()
    {
        return inputAxis;
    }

    public bool GetClickedStatus()
    {
        return clicked;
    }

    public bool GetHoldStatus()
    {
        return holding;
    }
}

#if UNITY_EDITOR
//Custom Editor
[CustomEditor(typeof(SC_ClickTracker))]
public class SC_ClickTracker_Editor : Editor
{
    public override void OnInspectorGUI()
    {
        SC_ClickTracker script = (SC_ClickTracker)target;

        script.buttonName = EditorGUILayout.TextField("Button Name", script.buttonName);
        script.isJoystick = EditorGUILayout.Toggle("Is Joystick", script.isJoystick);
        if (script.isJoystick)
        {
            script.movementLimit = EditorGUILayout.FloatField("Movement Limit", script.movementLimit);
            script.movementThreshold = EditorGUILayout.FloatField("Movement Threshold", script.movementThreshold);
        }
    }
}
#endif
SC_MobileControls.cs
using System.Collections;
using System.Collections.Generic;
using UnityEngine;

public class SC_MobileControls : MonoBehaviour
{
    [HideInInspector]
    public Canvas canvas;
    List<SC_ClickTracker> buttons = new List<SC_ClickTracker>();

    public static SC_MobileControls instance;

    void Awake()
    {
        //Assign this script to static variable, so it can be accessed from other scripts. Make sure there is only one SC_MobileControls in the Scene.
        instance = this;

        canvas = GetComponent<Canvas>();
    }

    public int AddButton(SC_ClickTracker button)
    {
        buttons.Add(button);

        return buttons.Count - 1;
    }

    public Vector2 GetJoystick(string joystickName)
    {
        for(int i = 0; i < buttons.Count; i++)
        {
            if(buttons[i].buttonName == joystickName)
            {
                return buttons[i].GetInputAxis();
            }
        }

        Debug.LogError("Joystick with a name '" + joystickName + "' not found. Make sure SC_ClickTracker is assigned to the button and the name is matching.");

        return Vector2.zero;
    }

    public bool GetMobileButton(string buttonName)
    {
        for (int i = 0; i < buttons.Count; i++)
        {
            if (buttons[i].buttonName == buttonName)
            {
                return buttons[i].GetHoldStatus();
            }
        }

        Debug.LogError("Button with a name '" + buttonName + "' not found. Make sure SC_ClickTracker is assigned to the button and the name is matching.");

        return false;
    }

    public bool GetMobileButtonDown(string buttonName)
    {
        for (int i = 0; i < buttons.Count; i++)
        {
            if (buttons[i].buttonName == buttonName)
            {
                return buttons[i].GetClickedStatus();
            }
        }

        Debug.LogError("Button with a name '" + buttonName + "' not found. Make sure SC_ClickTracker is assigned to the button and the name is matching.");

        return false;
    }
}
Paso 2: configurar controles móviles
- Crea un nuevo lienzo (GameObject -> UI -> Canvas)
- Cambie 'UI Scale Mode' en Canvas Scaler a 'Scale With Screen Size' y cambie la Resolución de referencia a la que está trabajando (en mi caso es 1000 x 600)
- Adjunte el script SC_MobileControls al objeto Canvas
- Haga clic derecho en Objeto Canvas -> UI -> Imagen
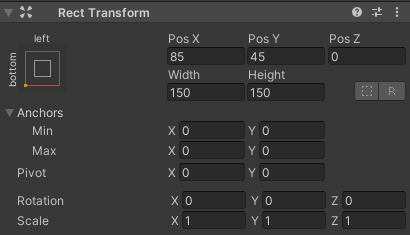
- Cambie el nombre de la imagen recién creada a "JoystickLeft"
- Cambie el Sprite "JoystickLeft" a un círculo vacío (no olvide cambiar el Tipo de textura a 'Sprite (2D and UI)' después de importarlo a Unity)

- Establezca los valores de "JoystickLeft" Rect Transform igual que en la captura de pantalla a continuación:
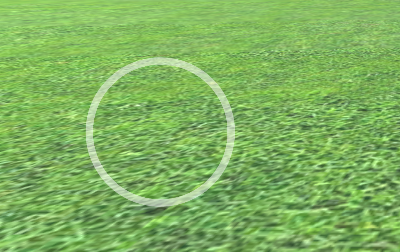
- En el componente Imagen, establezca el Color alfa en 0,5 para que el objeto sea ligeramente transparente:
- Duplique el objeto "JoystickLeft" y cámbiele el nombre a "JoystickLeftButton"
- Mueva "JoystickLeftButton" dentro del objeto "JoystickLeft"
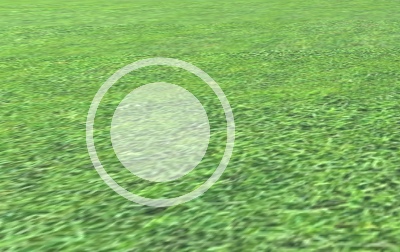
- Cambia el Sprite "JoystickLeftButton" a un círculo relleno:

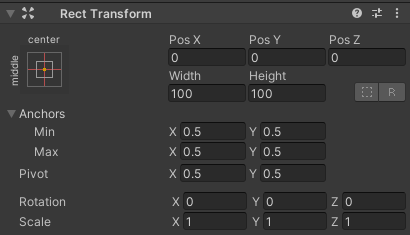
- Establezca los valores de "JoystickLeftButton" Rect Transform igual que en la siguiente captura de pantalla:
- Agregar componente de botón a "JoystickLeftButton"
- En el componente Botón, cambie Transición a 'None'
- Adjunte el script SC_ClickTracker a "JoystickLeftButton"
- En SC_ClickTracker, establezca el Nombre del botón en cualquier nombre único (en mi caso lo configuré en 'JoystickLeft') y habilite la casilla de verificación 'Is Joystick'.

El botón del joystick está listo. Puedes tener cualquier cantidad de Joysticks (En mi caso tendré 2, uno a la izquierda para controlar el movimiento y otro a la derecha para controlar la rotación).
- Duplique "JoystickLeft" y cámbiele el nombre a "JoystickRight"
- Expanda "JoystickRight" y cambie el nombre de "JoystickLeftButton" a "JoystickRightButton"
- Establezca los valores de "JoystickRight" Rect Transform igual que en la siguiente captura de pantalla:
- Seleccione el objeto "JoystickRightButton" y en SC_ClickTracker cambie el nombre del botón a 'JoystickRight'
El segundo joystick está listo.
Ahora creemos un botón normal:
- Haga clic derecho en Objeto Canvas -> UI -> Botón
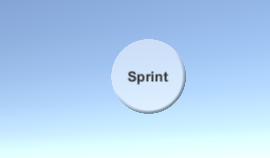
- Cambiar el nombre del objeto del botón a "SprintButton"
- Cambia el Sprite "SprintButton" a un Círculo con un efecto de bisel:

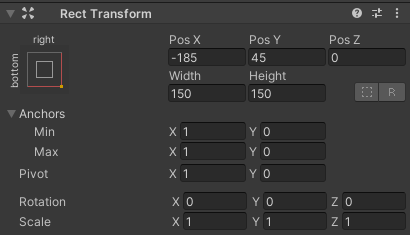
- Establezca los valores de "SprintButton" Rect Transform igual que en la siguiente captura de pantalla:

- Cambie el color alfa de la imagen "SprintButton" a 0,5
- Adjunte el script SC_ClickTracker al objeto "SprintButton"
- En SC_ClickTracker cambie el nombre del botón a 'Sprinting'
- Seleccione Objeto de texto dentro de "SprintButton" y cambie su texto a 'Sprint', también cambie el Tamaño de fuente a 'Bold'
El botón está listo.
Vamos a crear otro botón llamado "Jump":
- Duplique el objeto "SprintButton" y cámbiele el nombre a "JumpButton"
- Cambie el valor "JumpButton" Pos Y a 250
- En SC_ClickTracker cambie el nombre del botón a 'Jumping'
- Cambie el texto dentro de "JumpButton" a 'Jump'
Y el último botón es "Action":
- Duplique el objeto "JumpButton" y cámbiele el nombre a "ActionButton"
- Cambie el valor "ActionButton" Pos X a -185
- En SC_ClickTracker cambie el nombre del botón a 'Action'
- Cambie el texto dentro de "ActionButton" a 'Action'
Paso 3: implementar controles móviles
Si siguió los pasos anteriores, ahora puede usar estas funciones para implementar los controles móviles en su secuencia de comandos:
if(SC_MobileControls.instance.GetMobileButtonDown("BUTTON_NAME")){
	//Mobile button has been pressed one time, equivalent to if(Input.GetKeyDown(KeyCode...))
}

if(SC_MobileControls.instance.GetMobileButton("BUTTON_NAME")){
	//Mobile button is being held pressed, equivalent to if(Input.GetKey(KeyCode...))
}

//Get normalized direction of a on-screen Joystick
//Could be compared to: new Vector2(Input.GetAxis("Horizontal"), Input.GetAxis("Vertical")) or new Vector2(Input.GetAxis("Mouse X"), Input.GetAxis("Mouse Y"))
Vector2 inputAxis = SC_MobileControls.instance.GetJoystick("JOYSTICK_NAME");
Como ejemplo, implementaré controles móviles con un controlador FPS de este tutorial. Primero sigue ese tutorial, es bastante simple.
Si siguió ese tutorial, ahora tendrá el objeto "FPSPlayer" junto con Canvas con controles móviles.
Preservaremos los controles de escritorio y al mismo tiempo implementaremos los controles móviles, haciéndolo multiplataforma:
- Abra el script SC_FPSController, desplácese hasta la línea 28 y elimine esta parte (eliminar esa parte evitará que el cursor se bloquee y permitirá hacer clic en los controles móviles en el Editor):
        // Lock cursor
        Cursor.lockState = CursorLockMode.Locked;
Cursor.visible = false;- Desplácese hasta la línea 39 y reemplace:
        bool isRunning = Input.GetKey(KeyCode.LeftShift);
        float curSpeedX = canMove ? (isRunning ? runningSpeed : walkingSpeed) * Input.GetAxis("Vertical") : 0;
float curSpeedY = canMove ? (isRunning ? runningSpeed : walkingSpeed) * Input.GetAxis("Horizontal") : 0;- Con:
        bool isRunning = Input.GetKey(KeyCode.LeftShift) || SC_MobileControls.instance.GetMobileButton("Sprinting");
        float curSpeedX = canMove ? (isRunning ? runningSpeed : walkingSpeed) * (Input.GetAxis("Vertical") + SC_MobileControls.instance.GetJoystick("JoystickLeft").y) : 0;
float curSpeedY = canMove ? (isRunning ? runningSpeed : walkingSpeed) * (Input.GetAxis("Horizontal") + SC_MobileControls.instance.GetJoystick("JoystickLeft").x) : 0;- Desplácese hacia abajo hasta la línea 45 y reemplace:
if (Input.GetButton("Jump") && canMove && characterController.isGrounded)- Con:
if ((Input.GetButton("Jump") || SC_MobileControls.instance.GetMobileButtonDown("Jumping")) && canMove && characterController.isGrounded)- Desplácese hacia abajo hasta la línea 68 y reemplace:
            rotationX += -Input.GetAxis("Mouse Y") * lookSpeed;
            rotationX = Mathf.Clamp(rotationX, -lookXLimit, lookXLimit);
            playerCamera.transform.localRotation = Quaternion.Euler(rotationX, 0, 0);
transform.rotation *= Quaternion.Euler(0, Input.GetAxis("Mouse X") * lookSpeed, 0);- Con:
#if UNITY_IPHONE || UNITY_ANDROID || UNITY_EDITOR
            rotationX += -(SC_MobileControls.instance.GetJoystick("JoystickRight").y) * lookSpeed;
#else
            rotationX += -Input.GetAxis("Mouse Y") * lookSpeed;
#endif
            rotationX = Mathf.Clamp(rotationX, -lookXLimit, lookXLimit);
            playerCamera.transform.localRotation = Quaternion.Euler(rotationX, 0, 0);
#if UNITY_IPHONE || UNITY_ANDROID || UNITY_EDITOR
            transform.rotation *= Quaternion.Euler(0, SC_MobileControls.instance.GetJoystick("JoystickRight").x * lookSpeed, 0);
#else
            transform.rotation *= Quaternion.Euler(0, Input.GetAxis("Mouse X") * lookSpeed, 0);
#endif
Dado que el movimiento de la mirada interferirá con las pruebas del joystick en el Editor, estamos usando #if para compilación específica de la plataforma para separar la lógica móvil del resto de las plataformas.
El controlador Mobile FPS ya está listo, probémoslo:
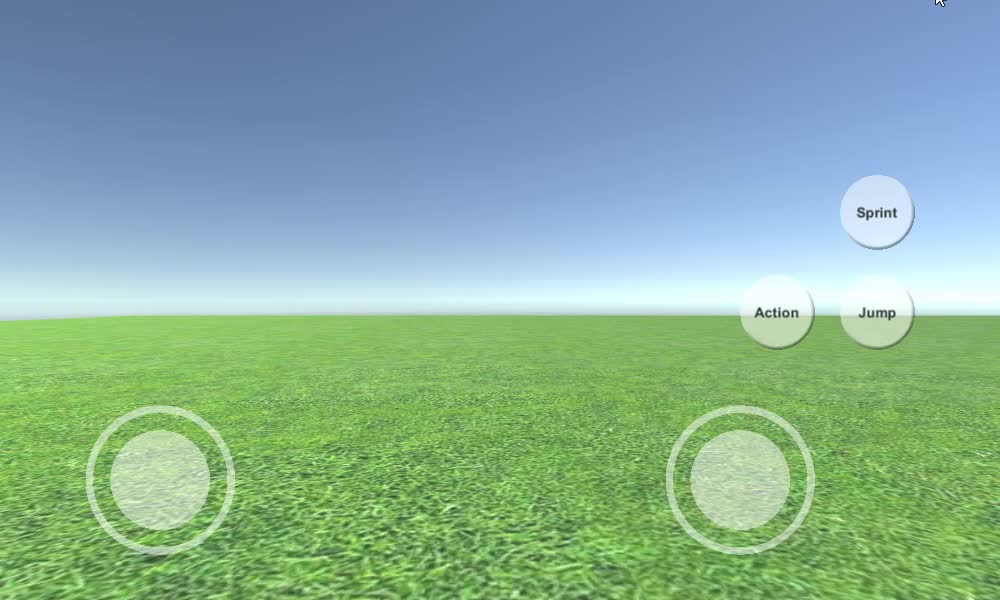
Como puede ver, todos los Joysticks y Botones son funcionales (excepto el botón "Action", que no se implementó por no tener una función adecuada para ello).