Minijuego en Unity | CUBEavoid
CUBEavoid es un minijuego creado en Unity. Código fuente y configuración a continuación.
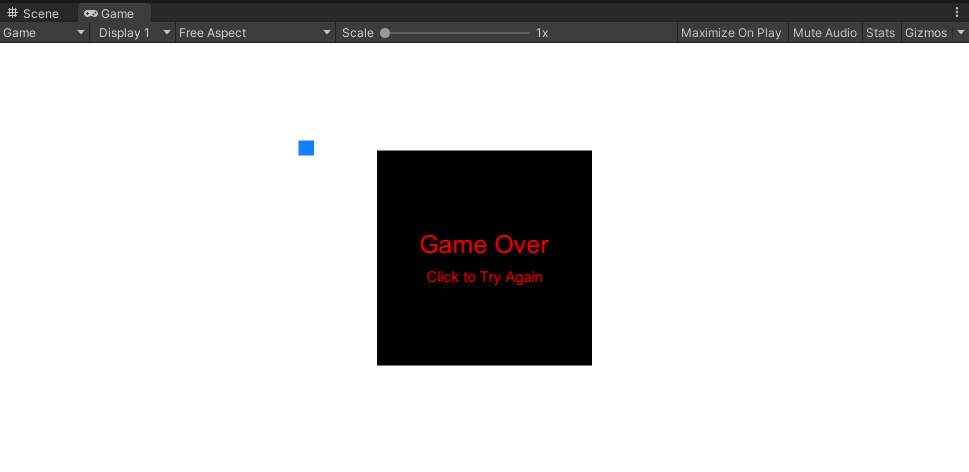
El objetivo es evitar el cubo pequeño reescalando el cubo grande con el cursor del mouse.
Paso 1: Crea todos los scripts necesarios
- Crea un nuevo script, llámalo SC_PlayerCube.cs, elimina todo de él y pega el código a continuación dentro de él:
Archivo SC_PlayerCube.cs
using System.Collections;
using System.Collections.Generic;
using UnityEngine;
using UnityEngine.UI;

public class SC_PlayerCube : MonoBehaviour
{
    //Assign enemy mesh renderer
    public MeshRenderer enemy;
    public Text gameOverText;

    Transform thisT;
    MeshRenderer mr;

    //Global static variable
    public static bool GameOver = false;

    // Start is called before the first frame update
    void Start()
    {
        thisT = transform;
        mr = GetComponent<MeshRenderer>();
        gameOverText.enabled = false;
    }

    // Update is called once per frame
    void Update()
    {
        if (GameOver)
            return;

        if (gameOverText.enabled)
        {
            //Game has resumed, disable game over text
            gameOverText.enabled = false;
        }

        //Scale player cube with mouse movement
        Vector3 playerScale = (new Vector3(Screen.width / 2 - Input.mousePosition.x, 1, Screen.height / 2 - Input.mousePosition.y)).normalized * 10;
        //Keep Y scale at 10
        playerScale.y = 10;
        //Limit minimum X and Z scale to 0.1
        if (playerScale.x >= 0 && playerScale.x < 0.1f)
        {
            playerScale.x = 0.1f;
        }
        else if (playerScale.x < 0 && playerScale.x > -0.1f)
        {
            playerScale.x = -0.1f;
        }
        if (playerScale.z >= 0 && playerScale.z < 0.1f)
        {
            playerScale.z = 0.1f;
        }
        else if (playerScale.z < 0 && playerScale.z > -0.1f)
        {
            playerScale.z = -0.1f;
        }
        thisT.localScale = playerScale;

        //Check if enemy have intersected with the player, if so, stop the game
        if (mr.bounds.Intersects(enemy.bounds))
        {
            GameOver = true;
            gameOverText.enabled = true;
        }
    }
}- Crea un nuevo script, llámalo SC_EnemyCube.cs, elimina todo de él y pega el código a continuación dentro de él:
SC_EnemyCube.cs
using System.Collections;
using System.Collections.Generic;
using UnityEngine;

//This script controls enemy cube AI
public class SC_EnemyCube : MonoBehaviour
{
    //Private variables
    Camera mainCamera;
    float movementTime = 0;
    Vector3 startPoint;
    Vector3 endPoint;

    // Start is called before the first frame update
    void Start()
    {
        //Get camera tagged "MainCamera"
        mainCamera = Camera.main;
        GenerateStartEndPoint();
    }

    //Assign start and end points slightly outside the Camera view
    void GenerateStartEndPoint()
    {
        Vector3 relativeStart;
        Vector3 relativeEnd;

        //Randomly pick whether to go Left <-> Right or Up <-> Down
        if (Random.Range(-10, 10) > 0)
        {
            relativeStart = new Vector3(Random.Range(-10, 10) > 0 ? 1.1f : -0.1f, Random.Range(0.00f, 1.00f), mainCamera.transform.position.y);
            if (relativeStart.y > 0.4f && relativeStart.y < 0.6f)
            {
                if(relativeStart.y >= 0.5f)
                {
                    relativeStart.y = 0.6f;
                }
                else
                {
                    relativeStart.y = 0.4f;
                }
            }
            relativeEnd = relativeStart;
            relativeEnd.x = relativeEnd.x > 1 ? -0.1f : 1.1f;
        }
        else
        {
            relativeStart = new Vector3(Random.Range(0.00f, 1.00f), Random.Range(-10, 10) > 0 ? 1.1f : -0.1f, mainCamera.transform.position.y);
            if (relativeStart.x > 0.4f && relativeStart.x < 0.6f)
            {
                if (relativeStart.x >= 0.5f)
                {
                    relativeStart.x = 0.6f;
                }
                else
                {
                    relativeStart.x = 0.4f;
                }
            }
            relativeEnd = relativeStart;
            relativeEnd.y = relativeEnd.y > 1 ? -0.1f : 1.1f;
        }

        //Convert screen points to world points
        startPoint = mainCamera.ViewportToWorldPoint(relativeStart);
        endPoint = mainCamera.ViewportToWorldPoint(relativeEnd);

        //Reset movement time
        movementTime = 0;
    }

    // Update is called once per frame
    void Update()
    {
        //Game over, wait for click
        if (SC_PlayerCube.GameOver)
        {
            //Click to resume
            if (Input.GetMouseButtonDown(0))
            {
                SC_PlayerCube.GameOver = false;
                GenerateStartEndPoint();
            }
            else
            {
                return;
            }
        }

        //Move enemy from one side to the other
        if(movementTime < 1)
        {
            movementTime += Time.deltaTime * 0.5f;

            transform.position = Vector3.Lerp(startPoint, endPoint, movementTime);
        }
        else
        {
            //Re-generate start / end point
            GenerateStartEndPoint();
        }
    }
}
Paso 2: Configuración
Después de crear los 2 scripts principales, procedamos a configurar el juego:
- Crea una nueva escena si aún no lo has hecho
- Seleccione la cámara principal, cambie su posición a (0, 10, 0) y su rotación a (90, 0, 0)
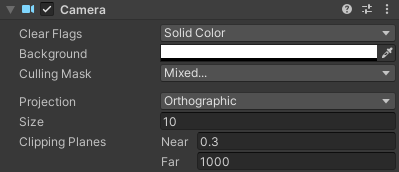
- Cambie las propiedades del componente Cámara de la cámara principal: Borrar banderas a 'Solid Color', Fondo a 'white', Proyección a 'Orthographic' y Tamaño a '10'
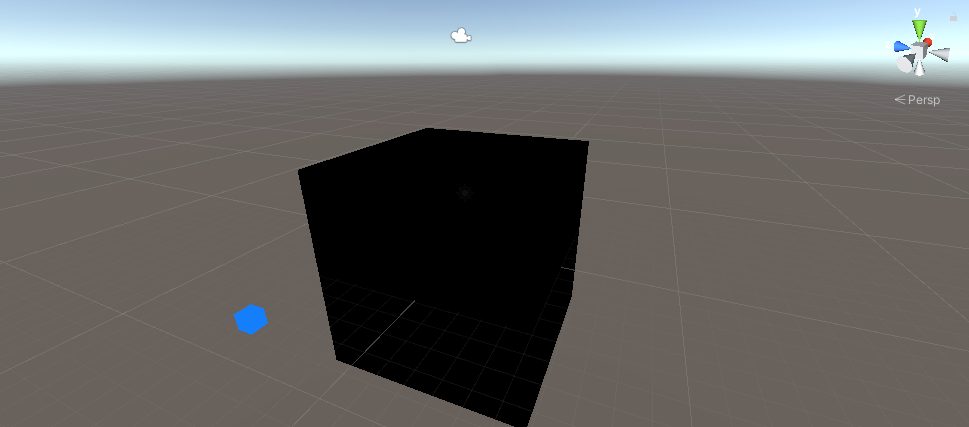
- Crea un nuevo cubo (Objeto de juego -> Objeto 3D -> Cubo) y nómbralo "Player"
- Cambie la posición "Player" a (0, 0, 0) y la escala a (10, 10, 10)
- Cree un nuevo material (haga clic derecho en la carpeta Proyecto -> Crear -> Material) y asígnele un nombre. "PlayerMaterial"
- Cambie "PlayerMaterial" Shader a Unlit/Color y cambie su color a negro.

- Asignar "PlayerMaterial" al cubo "Player"
- Duplica el cubo "Player" y cámbiale el nombre a "Enemy"
- Cambie la escala "Enemy" a (0,7, 0,7, 0,7)
- Duplica "PlayerMaterial" y renómbralo a "EnemyMaterial"
- Cambiar el color hexadecimal "EnemyMaterial" a 157EFB
- Por último, asigna "EnemyMaterial" a "Enemy" Cubo
Vamos a crear una interfaz de usuario sencilla:
- Crea un nuevo texto de IU (Objeto de juego -> IU -> Texto) y cámbiale el nombre a "GameOverText"
- Asegúrese de que la alineación de RectTransform para el nuevo texto esté establecida en Centro medio
- Establezca la posición del texto X y la posición Y en 0
- Cambiar la altura a 100
- Para el componente Texto, configure el texto a continuación (asegúrese de que la propiedad Texto enriquecido esté marcada):
Game Over
<size=15>Click to Try Again</size>- Establecer el tamaño de fuente a 25
- Establecer la alineación del texto en el centro medio
- Establecer el color del texto en rojo
Por último, vamos a asignar los scripts:
- Seleccione el cubo "Player" y asigne el script SC_PlayerCube a él
- Asigna el cubo "Enemy" a la variable Enemigo
- Asignar "GameOverText" a la variable Texto de fin de juego

- Seleccione "Enemy" el cubo y asigne el script SC_EnemyCube a él
Ahora, al presionar Reproducir, el cubo azul debería comenzar a moverse por la pantalla, lo cual debes evitar modificando el tamaño del cubo negro con el cursor del mouse.
Siéntete libre de mejorar este juego de cualquier manera.