Haz física de tornados en Unity
En este tutorial, crearemos una simulación de Tornado dentro de Unity.
Unity versión utilizada en este tutorial: Unity 2018.3.0f2 (64 bits)
Paso 1: crea todos los scripts necesarios
Este tutorial requiere 2 scripts:
SC_Caught.cs
//This script is attached automatically to each Object caught in Tornado

using UnityEngine;

public class SC_Caught : MonoBehaviour
{
    private SC_Tornado tornadoReference;
    private SpringJoint spring;
    [HideInInspector]
    public Rigidbody rigid;

    // Use this for initialization
    void Start()
    {
        rigid = GetComponent<Rigidbody>();
    }

    // Update is called once per frame
    void Update()
    {
        //Lift spring so objects are pulled upwards
        Vector3 newPosition = spring.connectedAnchor;
        newPosition.y = transform.position.y;
        spring.connectedAnchor = newPosition;
    }

    void FixedUpdate()
    {
        //Rotate object around tornado center
        Vector3 direction = transform.position - tornadoReference.transform.position;
        //Project
        Vector3 projection = Vector3.ProjectOnPlane(direction, tornadoReference.GetRotationAxis());
        projection.Normalize();
        Vector3 normal = Quaternion.AngleAxis(130, tornadoReference.GetRotationAxis()) * projection;
        normal = Quaternion.AngleAxis(tornadoReference.lift, projection) * normal;
        rigid.AddForce(normal * tornadoReference.GetStrength(), ForceMode.Force);

        Debug.DrawRay(transform.position, normal * 10, Color.red);
    }

    //Call this when tornadoReference already exists
    public void Init(SC_Tornado tornadoRef, Rigidbody tornadoRigidbody, float springForce)
    {
        //Make sure this is enabled (for reentrance)
        enabled = true;

        //Save tornado reference
        tornadoReference = tornadoRef;

        //Initialize the spring
        spring = gameObject.AddComponent<SpringJoint>();
        spring.spring = springForce;
        spring.connectedBody = tornadoRigidbody;

        spring.autoConfigureConnectedAnchor = false;

        //Set initial position of the caught object relative to its position and the tornado
        Vector3 initialPosition = Vector3.zero;
        initialPosition.y = transform.position.y;
        spring.connectedAnchor = initialPosition;
    }

    public void Release()
    {
        enabled = false;
        Destroy(spring);
    }
}
SC_Tornado.cs
//Tornado script controls tornado physics

using System.Collections.Generic;
using UnityEngine;

public class SC_Tornado : MonoBehaviour
{
    [Tooltip("Distance after which the rotation physics starts")]
    public float maxDistance = 20;

    [Tooltip("The axis that the caught objects will rotate around")]
    public Vector3 rotationAxis = new Vector3(0, 1, 0);

    [Tooltip("Angle that is added to the object's velocity (higher lift -> quicker on top)")]
    [Range(0, 90)]
    public float lift = 45;

    [Tooltip("The force that will drive the caught objects around the tornado's center")]
    public float rotationStrength = 50;

    [Tooltip("Tornado pull force")]
    public float tornadoStrength = 2;

    Rigidbody r;

    List<SC_Caught> caughtObject = new List<SC_Caught>();

    // Start is called before the first frame update
    void Start()
    {
        //Normalize the rotation axis given by the user
        rotationAxis.Normalize();

        r = GetComponent<Rigidbody>();
        r.isKinematic = true;
    }

    void FixedUpdate()
    {
        //Apply force to caught objects
        for (int i = 0; i < caughtObject.Count; i++)
        {
            if(caughtObject[i] != null)
            {
                Vector3 pull = transform.position - caughtObject[i].transform.position;
                if (pull.magnitude > maxDistance)
                {
                    caughtObject[i].rigid.AddForce(pull.normalized * pull.magnitude, ForceMode.Force);
                    caughtObject[i].enabled = false;
                }
                else
                {
                    caughtObject[i].enabled = true;
                }
            }
        }
    }

    void OnTriggerEnter(Collider other)
    {
        if (!other.attachedRigidbody) return;
        if (other.attachedRigidbody.isKinematic) return;

        //Add caught object to the list
        SC_Caught caught = other.GetComponent<SC_Caught>();
        if (!caught)
        {
            caught = other.gameObject.AddComponent<SC_Caught>();
        }

        caught.Init(this, r, tornadoStrength);

        if (!caughtObject.Contains(caught))
        {
            caughtObject.Add(caught);
        }
    }

    void OnTriggerExit(Collider other)
    {
        //Release caught object
        SC_Caught caught = other.GetComponent<SC_Caught>();
        if (caught)
        {
            caught.Release();

            if (caughtObject.Contains(caught))
            {
                caughtObject.Remove(caught);
            }
        }
    }

    public float GetStrength()
    {
        return rotationStrength;
    }

    //The axis the caught objects rotate around
    public Vector3 GetRotationAxis()
    {
        return rotationAxis;
    }

    //Draw tornado radius circle in Editor
    void OnDrawGizmosSelected()
    {
        Vector3[] positions = new Vector3[30];
        Vector3 centrePos = transform.position;
        for (int pointNum = 0; pointNum < positions.Length; pointNum++)
        {
            // "i" now represents the progress around the circle from 0-1
            // we multiply by 1.0 to ensure we get a fraction as a result.
            float i = (float)(pointNum * 2) / positions.Length;

            // get the angle for this step (in radians, not degrees)
            float angle = i * Mathf.PI * 2;

            // the X & Y position for this angle are calculated using Sin & Cos
            float x = Mathf.Sin(angle) * maxDistance;
            float z = Mathf.Cos(angle) * maxDistance;

            Vector3 pos = new Vector3(x, 0, z) + centrePos;
            positions[pointNum] = pos;
        }

        Gizmos.color = Color.cyan;
        for (int i = 0; i < positions.Length; i++)
        {
            if (i == positions.Length - 1)
            {
                Gizmos.DrawLine(positions[0], positions[positions.Length - 1]);
            }
            else
            {
                Gizmos.DrawLine(positions[i], positions[i + 1]);
            }
        }
    }
}![]()
Paso 2: crear un tornado
1. Crea partículas de tornado:
- Crea un nuevo GameObject (GameObject -> Crear vacío) y asígnale un nombre "Tornado"
- Crea otro GameObject y llámalo "Particles", muévelo dentro de "Tornado" y cambia su posición a (0, 0, 0)
- Agregue un componente ParticleSystem al "Particles" GameObject
- En el sistema de partículas, habilite estos módulos: Emisión, Forma, Velocidad durante toda la vida, Color durante toda la vida, Tamaño durante toda la vida , Rotación durante la vida útil, Fuerzas externas, Renderizador.

2. Asigne los valores para cada módulo del Sistema de partículas (consulte las capturas de pantalla a continuación):
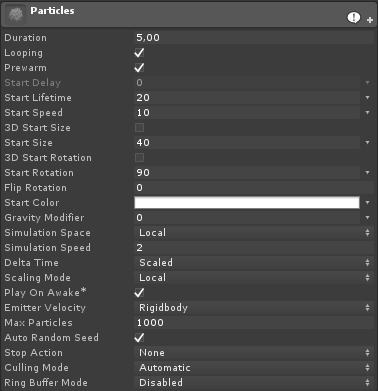
Módulo principal (partículas):
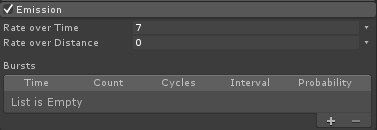
Módulo de emisión:
Módulo de forma:
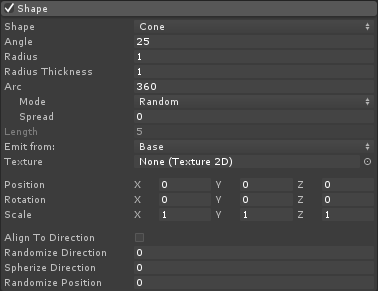
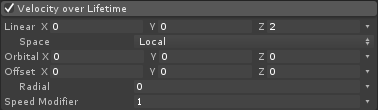
Módulo de velocidad a lo largo de la vida útil:
Módulo Color a lo largo de toda la vida:
![]()
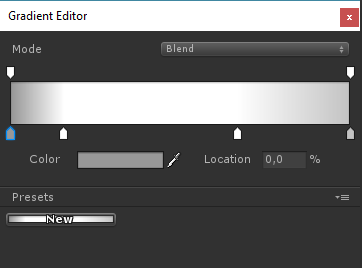
(2 colores Grises en cada extremo y 2 colores Blancos en la parte interior)
Módulo de tamaño a lo largo de la vida útil:

(El tamaño durante toda la vida utiliza una curva similar a esta):
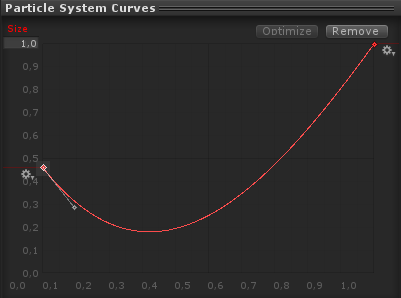
(El tamaño baja ligeramente y luego aumenta)
Rotación a lo largo de la vida:

Módulo de Fuerzas Externas:
Este módulo no necesita ningún cambio, solo deja los valores predeterminados.
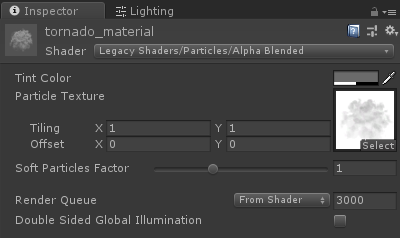
Módulo de renderizado:
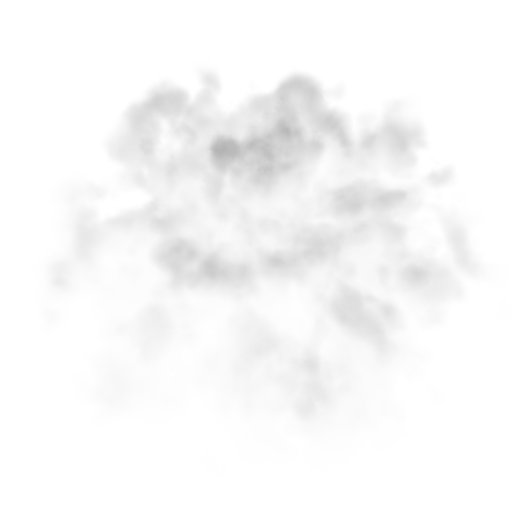
Para este módulo sólo necesitamos asignar el siguiente material:
- Crea un nuevo material y llámalo. "tornado_material"
- Cambie su sombreador a "Legacy Shaders/Particles/Alpha Blended"
- Asígnale la textura siguiente (o haz clic aquí):
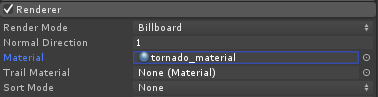
- Asigne tornado_material a un módulo Renderer:
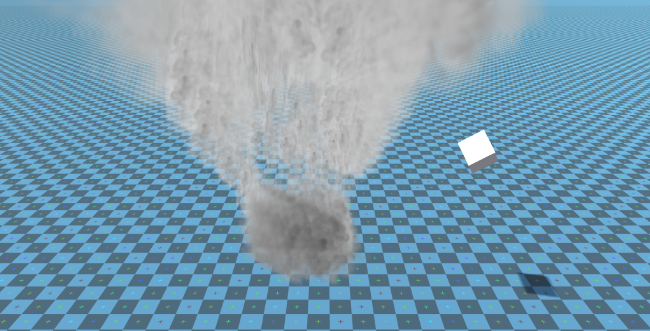
Ahora las partículas de Tornado deberían verse así:
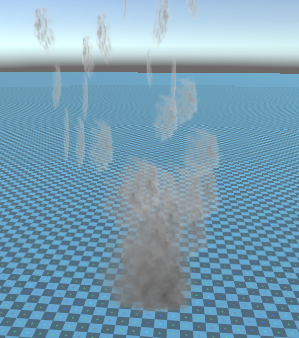
Pero como puedes ver no parece un Tornado en absoluto, eso es porque tenemos un componente más para agregar, que es el Campo de Fuerza del Sistema de Partículas, este componente es necesario para simular el viento circular:
- Crea un nuevo GameObject y nómbralo "ForceField"
- Mueva "ForceField" dentro de "Tornado" GameObject y cambie su posición a (0, 0, 0)

- Agregue el componente Campo de fuerza del sistema de partículas a "ForceField"
- Cambie los valores del componente Campo de fuerza a los mismos que en la captura de pantalla siguiente:
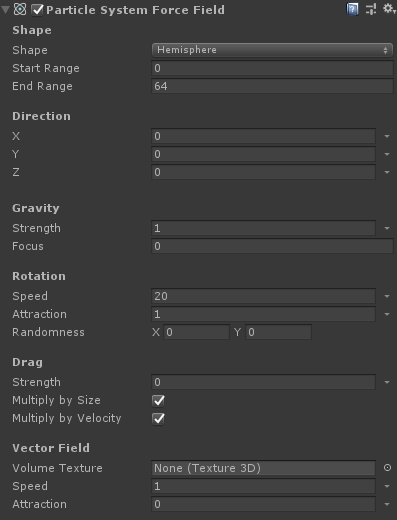
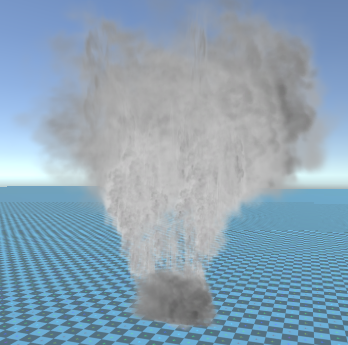
Ahora las partículas deberían verse así, que es mucho mejor:
3. Configuración de la física de tornados
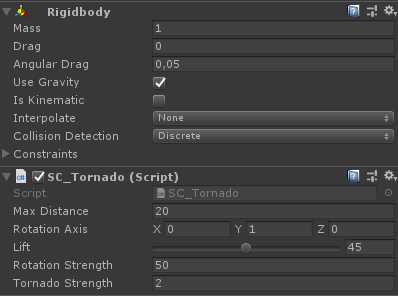
- Agregue componentes Rigidbody y SC_Tornado a "Tornado" GameObject
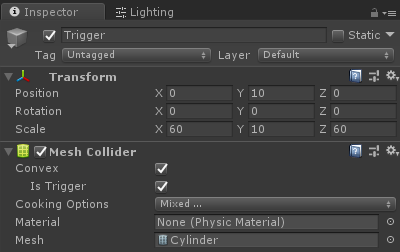
- Crea un nuevo GameObject y nómbralo "Trigger"
- Mueva "Trigger" dentro de "Tornado" GameObject y cambie su posición a (0, 10, 0) y cambie su escala a (60, 10, 60)
- Agregue el componente MeshCollider a "Trigger" GameObject, marque las casillas de verificación Convex y IsTrigger y cambie su malla al cilindro predeterminado.
¡El tornado ya está listo!
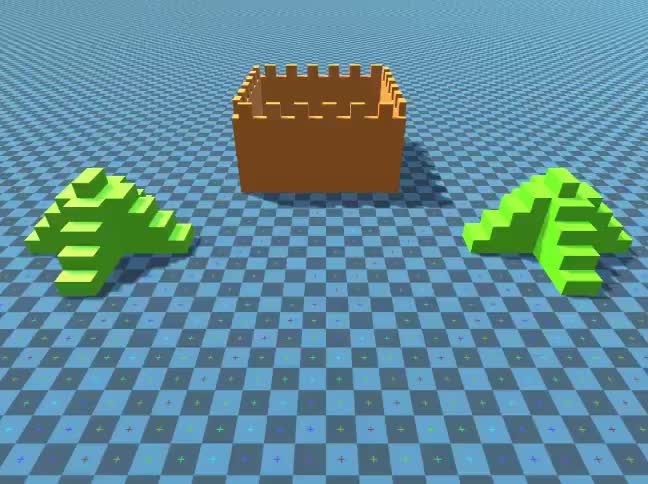
Para probarlo, simplemente cree un cubo y agregue un componente Rigidbody, luego colóquelo dentro del área de activación.
Una vez que presiones Jugar, el Tornado debería atraer el cubo: