Cómo hacer un FPS con el soporte de IA en Unity
El juego de disparos en primera persona (FPS) es un subgénero de los juegos de disparos en los que el jugador es controlado desde una perspectiva en primera persona.
Para hacer un juego FPS en Unity, necesitaremos un controlador de jugador, una variedad de elementos (armas en este caso) y los enemigos.
Paso 1: crea el controlador del reproductor
Aquí crearemos un controlador que será utilizado por nuestro reproductor.
- Cree un nuevo Objeto de juego (Objeto de juego -> Crear vacío) y asígnele un nombre "Player"
- Cree una nueva Cápsula (Objeto de juego -> Objeto 3D -> Cápsula) y muévala dentro del Objeto "Player"
- Retire el componente Capsule Collider de Capsule y cambie su posición a (0, 1, 0)
- Mueva la cámara principal dentro del objeto "Player" y cambie su posición a (0, 1.64, 0)
- Cree un nuevo script, asígnele el nombre "SC_CharacterController" y pegue el siguiente código dentro de él:
SC_CharacterController.cs
using UnityEngine;

[RequireComponent(typeof(CharacterController))]

public class SC_CharacterController : MonoBehaviour
{
    public float speed = 7.5f;
    public float jumpSpeed = 8.0f;
    public float gravity = 20.0f;
    public Camera playerCamera;
    public float lookSpeed = 2.0f;
    public float lookXLimit = 45.0f;

    CharacterController characterController;
    Vector3 moveDirection = Vector3.zero;
    Vector2 rotation = Vector2.zero;

    [HideInInspector]
    public bool canMove = true;

    void Start()
    {
        characterController = GetComponent<CharacterController>();
        rotation.y = transform.eulerAngles.y;
    }

    void Update()
    {
        if (characterController.isGrounded)
        {
            // We are grounded, so recalculate move direction based on axes
            Vector3 forward = transform.TransformDirection(Vector3.forward);
            Vector3 right = transform.TransformDirection(Vector3.right);
            float curSpeedX = canMove ? speed * Input.GetAxis("Vertical") : 0;
            float curSpeedY = canMove ? speed * Input.GetAxis("Horizontal") : 0;
            moveDirection = (forward * curSpeedX) + (right * curSpeedY);

            if (Input.GetButton("Jump") && canMove)
            {
                moveDirection.y = jumpSpeed;
            }
        }

        // Apply gravity. Gravity is multiplied by deltaTime twice (once here, and once below
        // when the moveDirection is multiplied by deltaTime). This is because gravity should be applied
        // as an acceleration (ms^-2)
        moveDirection.y -= gravity * Time.deltaTime;

        // Move the controller
        characterController.Move(moveDirection * Time.deltaTime);

        // Player and Camera rotation
        if (canMove)
        {
            rotation.y += Input.GetAxis("Mouse X") * lookSpeed;
            rotation.x += -Input.GetAxis("Mouse Y") * lookSpeed;
            rotation.x = Mathf.Clamp(rotation.x, -lookXLimit, lookXLimit);
            playerCamera.transform.localRotation = Quaternion.Euler(rotation.x, 0, 0);
            transform.eulerAngles = new Vector2(0, rotation.y);
        }
    }
}- Adjunte el script SC_CharacterController al objeto "Player" (notará que también agregó otro componente llamado Controlador de caracteres, cambiando su valor central a (0, 1, 0))
- Asigne la cámara principal a la variable Player Camera en SC_CharacterController
El controlador del reproductor ahora está listo:
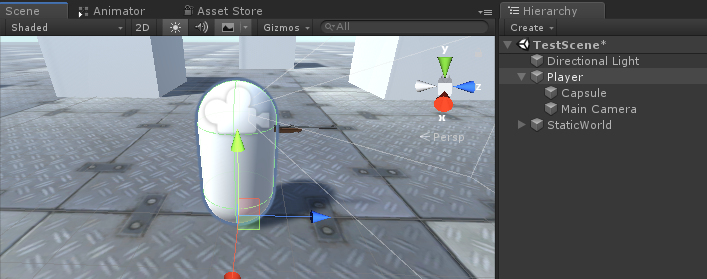
Paso 2: crea el sistema de armas
El sistema de armas del jugador constará de 3 componentes: un administrador de armas, un script de armas y un script de viñetas.
- Cree un nuevo script, asígnele el nombre "SC_WeaponManager" y pegue el siguiente código dentro de él:
SC_WeaponManager.cs
using UnityEngine;

public class SC_WeaponManager : MonoBehaviour
{
    public Camera playerCamera;
    public SC_Weapon primaryWeapon;
    public SC_Weapon secondaryWeapon;

    [HideInInspector]
    public SC_Weapon selectedWeapon;

    // Start is called before the first frame update
    void Start()
    {
        //At the start we enable the primary weapon and disable the secondary
        primaryWeapon.ActivateWeapon(true);
        secondaryWeapon.ActivateWeapon(false);
        selectedWeapon = primaryWeapon;
        primaryWeapon.manager = this;
        secondaryWeapon.manager = this;
    }

    // Update is called once per frame
    void Update()
    {
        //Select secondary weapon when pressing 1
        if (Input.GetKeyDown(KeyCode.Alpha1))
        {
            primaryWeapon.ActivateWeapon(false);
            secondaryWeapon.ActivateWeapon(true);
            selectedWeapon = secondaryWeapon;
        }

        //Select primary weapon when pressing 2
        if (Input.GetKeyDown(KeyCode.Alpha2))
        {
            primaryWeapon.ActivateWeapon(true);
            secondaryWeapon.ActivateWeapon(false);
            selectedWeapon = primaryWeapon;
        }
    }
}- Cree un nuevo script, asígnele el nombre "SC_Weapon" y pegue el siguiente código dentro de él:
SC_Weapon.cs
using System.Collections;
using UnityEngine;

[RequireComponent(typeof(AudioSource))]

public class SC_Weapon : MonoBehaviour
{
    public bool singleFire = false;
    public float fireRate = 0.1f;
    public GameObject bulletPrefab;
    public Transform firePoint;
    public int bulletsPerMagazine = 30;
    public float timeToReload = 1.5f;
    public float weaponDamage = 15; //How much damage should this weapon deal
    public AudioClip fireAudio;
    public AudioClip reloadAudio;

    [HideInInspector]
    public SC_WeaponManager manager;

    float nextFireTime = 0;
    bool canFire = true;
    int bulletsPerMagazineDefault = 0;
    AudioSource audioSource;

    // Start is called before the first frame update
    void Start()
    {
        bulletsPerMagazineDefault = bulletsPerMagazine;
        audioSource = GetComponent<AudioSource>();
        audioSource.playOnAwake = false;
        //Make sound 3D
        audioSource.spatialBlend = 1f;
    }

    // Update is called once per frame
    void Update()
    {
        if (Input.GetMouseButtonDown(0) && singleFire)
        {
            Fire();
        }
        if (Input.GetMouseButton(0) && !singleFire)
        {
            Fire();
        }
        if (Input.GetKeyDown(KeyCode.R) && canFire)
        {
            StartCoroutine(Reload());
        }
    }

    void Fire()
    {
        if (canFire)
        {
            if (Time.time > nextFireTime)
            {
                nextFireTime = Time.time + fireRate;

                if (bulletsPerMagazine > 0)
                {
                    //Point fire point at the current center of Camera
                    Vector3 firePointPointerPosition = manager.playerCamera.transform.position + manager.playerCamera.transform.forward * 100;
                    RaycastHit hit;
                    if (Physics.Raycast(manager.playerCamera.transform.position, manager.playerCamera.transform.forward, out hit, 100))
                    {
                        firePointPointerPosition = hit.point;
                    }
                    firePoint.LookAt(firePointPointerPosition);
                    //Fire
                    GameObject bulletObject = Instantiate(bulletPrefab, firePoint.position, firePoint.rotation);
                    SC_Bullet bullet = bulletObject.GetComponent<SC_Bullet>();
                    //Set bullet damage according to weapon damage value
                    bullet.SetDamage(weaponDamage);

                    bulletsPerMagazine--;
                    audioSource.clip = fireAudio;
                    audioSource.Play();
                }
                else
                {
                    StartCoroutine(Reload());
                }
            }
        }
    }

    IEnumerator Reload()
    {
        canFire = false;

        audioSource.clip = reloadAudio;
        audioSource.Play();

        yield return new WaitForSeconds(timeToReload);

        bulletsPerMagazine = bulletsPerMagazineDefault;

        canFire = true;
    }

    //Called from SC_WeaponManager
    public void ActivateWeapon(bool activate)
    {
        StopAllCoroutines();
        canFire = true;
        gameObject.SetActive(activate);
    }
}- Cree un nuevo script, asígnele el nombre "SC_Bullet" y pegue el siguiente código dentro de él:
SC_Bullet.cs
using System.Collections;
using UnityEngine;

public class SC_Bullet : MonoBehaviour
{
    public float bulletSpeed = 345;
    public float hitForce = 50f;
    public float destroyAfter = 3.5f;

    float currentTime = 0;
    Vector3 newPos;
    Vector3 oldPos;
    bool hasHit = false;

    float damagePoints;

    // Start is called before the first frame update
    IEnumerator Start()
    {
        newPos = transform.position;
        oldPos = newPos;

        while (currentTime < destroyAfter && !hasHit)
        {
            Vector3 velocity = transform.forward * bulletSpeed;
            newPos += velocity * Time.deltaTime;
            Vector3 direction = newPos - oldPos;
            float distance = direction.magnitude;
            RaycastHit hit;

            // Check if we hit anything on the way
            if (Physics.Raycast(oldPos, direction, out hit, distance))
            {
                if (hit.rigidbody != null)
                {
                    hit.rigidbody.AddForce(direction * hitForce);

                    IEntity npc = hit.transform.GetComponent<IEntity>();
                    if (npc != null)
                    {
                        //Apply damage to NPC
                        npc.ApplyDamage(damagePoints);
                    }
                }

                newPos = hit.point; //Adjust new position
                StartCoroutine(DestroyBullet());
            }

            currentTime += Time.deltaTime;
            yield return new WaitForFixedUpdate();

            transform.position = newPos;
            oldPos = newPos;
        }

        if (!hasHit)
        {
            StartCoroutine(DestroyBullet());
        }
    }

    IEnumerator DestroyBullet()
    {
        hasHit = true;
        yield return new WaitForSeconds(0.5f);
        Destroy(gameObject);
    }

    //Set how much damage this bullet will deal
    public void SetDamage(float points)
    {
        damagePoints = points;
    }
}
Ahora, notará que el script SC_Bullet tiene algunos errores. Eso es porque tenemos una última cosa que hacer, que es definir la interfaz IEntity.
Las interfaces en C# son útiles cuando necesita asegurarse de que el script que lo usa tenga ciertos métodos implementados.
La interfaz de IEntity tendrá un método que es ApplyDamage, que luego se usará para infligir daño a los enemigos y a nuestro jugador.
- Cree un nuevo script, asígnele el nombre "SC_InterfaceManager" y pegue el siguiente código dentro:
SC_InterfaceManager.cs
//Entity interafce
interface IEntity
{
    void ApplyDamage(float points);
}
Configuración de un administrador de armas
Un administrador de armas es un Objeto que residirá debajo del Objeto de la cámara principal y contendrá todas las armas.
- Cree un nuevo GameObject y asígnele un nombre "WeaponManager"
- Mueva el Administrador de armas dentro de la cámara principal del jugador y cambie su posición a (0, 0, 0)
- Adjunte el script SC_WeaponManager a "WeaponManager"
- Asigne la cámara principal a la variable Player Camera en SC_WeaponManager
Configuración de un rifle
- Arrastre y suelte el modelo de su arma en la escena (o simplemente cree un Cubo y estírelo si aún no tiene un modelo).
- Escale el modelo para que su tamaño sea relativo a una Player Capsule
En mi caso, usaré un modelo de Rifle hecho a medida (BERGARA BA13):
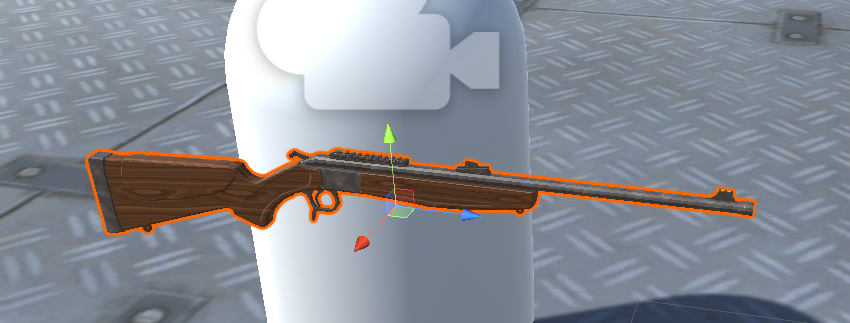
- Cree un nuevo GameObject y asígnele el nombre "Rifle" y luego mueva el modelo de rifle dentro de él
- Mueva el objeto "Rifle" dentro del objeto "WeaponManager" y colóquelo frente a la cámara de esta manera:
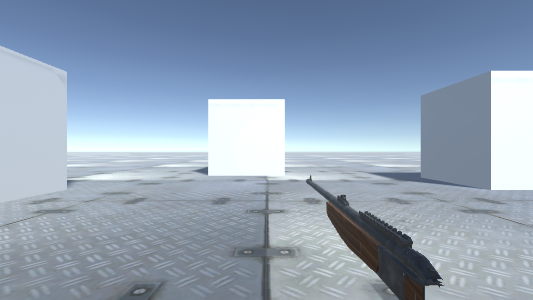
Para corregir el recorte de objetos, simplemente cambie el plano de recorte cercano de la cámara a algo más pequeño (en mi caso, lo configuré en 0.15):
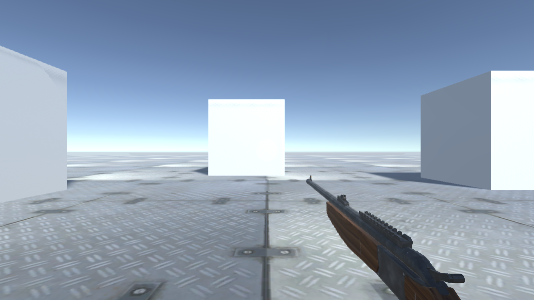
Mucho mejor.
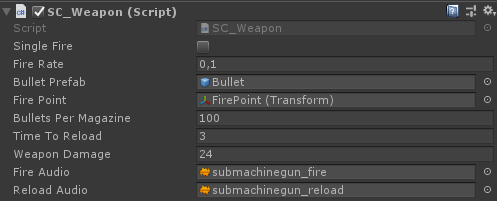
- Adjunte el script SC_Weapon a un objeto Rifle (observará que también agregó un componente de fuente de audio, esto es necesario para reproducir el fuego y recargar audios).
Como puede ver, SC_Weapon tiene 4 variables para asignar. Puede asignar las variables Activar audio y Recargar audio de inmediato si tiene clips de audio adecuados en su proyecto.
La variable Bullet Prefab se explicará más adelante en este tutorial.
Por ahora, solo asignaremos la variable Punto de incendio:
- Cree un nuevo GameObject, cámbiele el nombre a "FirePoint" y muévalo dentro de Rifle Object. Colóquelo justo en frente del barril o ligeramente adentro, así:
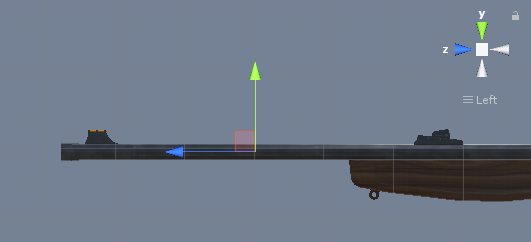
- Asigne FirePoint Transform a una variable de punto de fuego en SC_Weapon
- Asignar rifle a una variable de arma secundaria en el script SC_WeaponManager
Configuración de una ametralladora
- Duplique el Objeto Rifle y cámbiele el nombre a Metralleta
- Sustituir el modelo de pistola que lleva dentro por otro modelo diferente (En mi caso usaré el modelo hecho a medida de TAVOR X95)
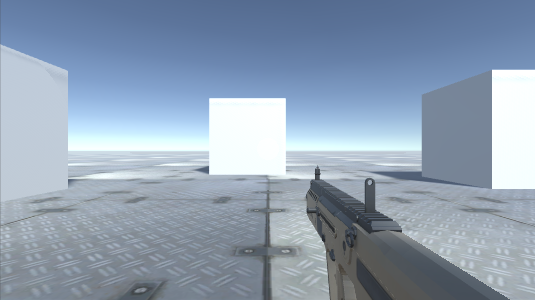
- Mueva la transformación de Fire Point hasta que se ajuste al nuevo modelo
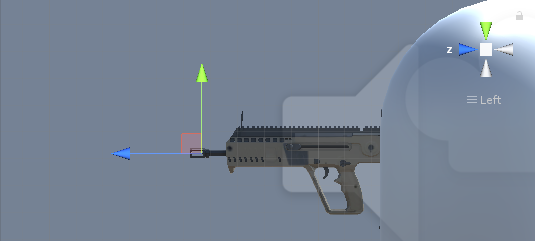
- Asignar ametralladora a una variable de arma principal en el script SC_WeaponManager

Configuración de un prefabricado Bullet
Bullet prefab se generará de acuerdo con la velocidad de disparo de un arma y usará Raycast para detectar si golpeó algo e infligió daño.
- Cree un nuevo GameObject y asígnele un nombre "Bullet"
- Agregue el componente Trail Renderer y cambie su variable de tiempo a 0.1.
- Establezca la curva de ancho en un valor más bajo (por ejemplo, Inicio 0.1 final 0), para agregar un rastro que se vea puntiagudo
- Cree un nuevo Material y asígnele el nombre bullet_trail_material y cambie su Shader a Particles/Additive
- Asigne un material recién creado a un Trail Renderer
- Cambie el Color de Trail Renderer a algo diferente (por ejemplo, Inicio: Naranja brillante Final: Naranja más oscuro)

- Guarde el objeto Bullet en Prefab y elimínelo de la escena.
- Asigne un prefabricado recién creado (arrastrar y soltar desde la vista Proyecto) a la variable prefabricado de balas de rifle y metralleta
Pistola ametralladora:
Rifle:
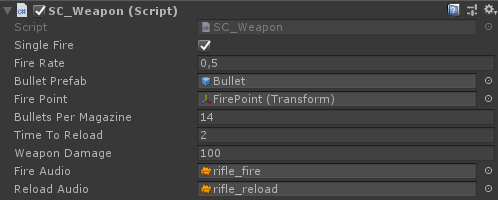
Las armas ya están listas.
Paso 3: crea la IA enemiga
Los enemigos serán simples cubos que seguirán al jugador y atacarán una vez que estén lo suficientemente cerca. Atacarán en oleadas, y cada oleada tendrá más enemigos para eliminar.
Configuración de la IA enemiga
A continuación, he creado 2 variaciones del Cubo (la izquierda es para la instancia viva y la derecha se generará una vez que el enemigo muera):
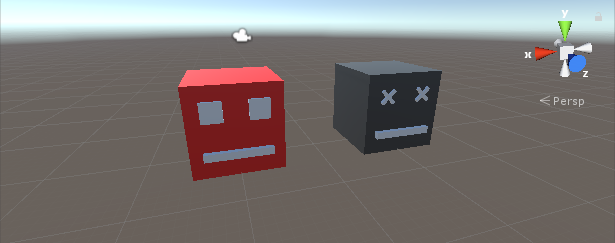
- Agregue un componente Rigidbody a instancias muertas y vivas
- Guarde la instancia muerta en Prefab y elimínela de la escena.
Ahora, la instancia viva necesitará un par de componentes más para poder navegar por el nivel del juego e infligir daño al jugador.
- Cree un nuevo script y asígnele el nombre "SC_NPCEnemy" y luego pegue el siguiente código dentro de él:
SC_NPCEnemy.cs
using UnityEngine;
using UnityEngine.AI;

[RequireComponent(typeof(NavMeshAgent))]

public class SC_NPCEnemy : MonoBehaviour, IEntity
{
    public float attackDistance = 3f;
    public float movementSpeed = 4f;
    public float npcHP = 100;
    //How much damage will npc deal to the player
    public float npcDamage = 5;
    public float attackRate = 0.5f;
    public Transform firePoint;
    public GameObject npcDeadPrefab;

    [HideInInspector]
    public Transform playerTransform;
    [HideInInspector]
    public SC_EnemySpawner es;
    NavMeshAgent agent;
    float nextAttackTime = 0;

    // Start is called before the first frame update
    void Start()
    {
        agent = GetComponent<NavMeshAgent>();
        agent.stoppingDistance = attackDistance;
        agent.speed = movementSpeed;

        //Set Rigidbody to Kinematic to prevent hit register bug
        if (GetComponent<Rigidbody>())
        {
            GetComponent<Rigidbody>().isKinematic = true;
        }
    }

    // Update is called once per frame
    void Update()
    {
        if (agent.remainingDistance - attackDistance < 0.01f)
        {
            if(Time.time > nextAttackTime)
            {
                nextAttackTime = Time.time + attackRate;

                //Attack
                RaycastHit hit;
                if(Physics.Raycast(firePoint.position, firePoint.forward, out hit, attackDistance))
                {
                    if (hit.transform.CompareTag("Player"))
                    {
                        Debug.DrawLine(firePoint.position, firePoint.position + firePoint.forward * attackDistance, Color.cyan);

                        IEntity player = hit.transform.GetComponent<IEntity>();
                        player.ApplyDamage(npcDamage);
                    }
                }
            }
        }
        //Move towardst he player
        agent.destination = playerTransform.position;
        //Always look at player
        transform.LookAt(new Vector3(playerTransform.transform.position.x, transform.position.y, playerTransform.position.z));
    }

    public void ApplyDamage(float points)
    {
        npcHP -= points;
        if(npcHP <= 0)
        {
            //Destroy the NPC
            GameObject npcDead = Instantiate(npcDeadPrefab, transform.position, transform.rotation);
            //Slightly bounce the npc dead prefab up
            npcDead.GetComponent<Rigidbody>().velocity = (-(playerTransform.position - transform.position).normalized * 8) + new Vector3(0, 5, 0);
            Destroy(npcDead, 10);
            es.EnemyEliminated(this);
            Destroy(gameObject);
        }
    }
}- Cree un nuevo script, asígnele el nombre "SC_EnemySpawner" y luego pegue el siguiente código dentro de él:
SC_EnemySpawner.cs
using UnityEngine;
using UnityEngine.SceneManagement;

public class SC_EnemySpawner : MonoBehaviour
{
    public GameObject enemyPrefab;
    public SC_DamageReceiver player;
    public Texture crosshairTexture;
    public float spawnInterval = 2; //Spawn new enemy each n seconds
    public int enemiesPerWave = 5; //How many enemies per wave
    public Transform[] spawnPoints;

    float nextSpawnTime = 0;
    int waveNumber = 1;
    bool waitingForWave = true;
    float newWaveTimer = 0;
    int enemiesToEliminate;
    //How many enemies we already eliminated in the current wave
    int enemiesEliminated = 0;
    int totalEnemiesSpawned = 0;

    // Start is called before the first frame update
    void Start()
    {
        //Lock cursor
        Cursor.lockState = CursorLockMode.Locked;
        Cursor.visible = false;

        //Wait 10 seconds for new wave to start
        newWaveTimer = 10;
        waitingForWave = true;
    }

    // Update is called once per frame
    void Update()
    {
        if (waitingForWave)
        {
            if(newWaveTimer >= 0)
            {
                newWaveTimer -= Time.deltaTime;
            }
            else
            {
                //Initialize new wave
                enemiesToEliminate = waveNumber * enemiesPerWave;
                enemiesEliminated = 0;
                totalEnemiesSpawned = 0;
                waitingForWave = false;
            }
        }
        else
        {
            if(Time.time > nextSpawnTime)
            {
                nextSpawnTime = Time.time + spawnInterval;

                //Spawn enemy
                if(totalEnemiesSpawned < enemiesToEliminate)
                {
                    Transform randomPoint = spawnPoints[Random.Range(0, spawnPoints.Length - 1)];

                    GameObject enemy = Instantiate(enemyPrefab, randomPoint.position, Quaternion.identity);
                    SC_NPCEnemy npc = enemy.GetComponent<SC_NPCEnemy>();
                    npc.playerTransform = player.transform;
                    npc.es = this;
                    totalEnemiesSpawned++;
                }
            }
        }

        if (player.playerHP <= 0)
        {
            if (Input.GetKeyDown(KeyCode.Space))
            {
                Scene scene = SceneManager.GetActiveScene();
                SceneManager.LoadScene(scene.name);
            }
        }
    }

    void OnGUI()
    {
        GUI.Box(new Rect(10, Screen.height - 35, 100, 25), ((int)player.playerHP).ToString() + " HP");
        GUI.Box(new Rect(Screen.width / 2 - 35, Screen.height - 35, 70, 25), player.weaponManager.selectedWeapon.bulletsPerMagazine.ToString());

        if(player.playerHP <= 0)
        {
            GUI.Box(new Rect(Screen.width / 2 - 85, Screen.height / 2 - 20, 170, 40), "Game Over\n(Press 'Space' to Restart)");
        }
        else
        {
            GUI.DrawTexture(new Rect(Screen.width / 2 - 3, Screen.height / 2 - 3, 6, 6), crosshairTexture);
        }

        GUI.Box(new Rect(Screen.width / 2 - 50, 10, 100, 25), (enemiesToEliminate - enemiesEliminated).ToString());

        if (waitingForWave)
        {
            GUI.Box(new Rect(Screen.width / 2 - 125, Screen.height / 4 - 12, 250, 25), "Waiting for Wave " + waveNumber.ToString() + " (" + ((int)newWaveTimer).ToString() + " seconds left...)");
        }
    }

    public void EnemyEliminated(SC_NPCEnemy enemy)
    {
        enemiesEliminated++;

        if(enemiesToEliminate - enemiesEliminated <= 0)
        {
            //Start next wave
            newWaveTimer = 10;
            waitingForWave = true;
            waveNumber++;
        }
    }
}- Cree un nuevo script, asígnele el nombre "SC_DamageReceiver" y luego pegue el siguiente código dentro de él:
SC_DamageReceiver.cs
using UnityEngine;

public class SC_DamageReceiver : MonoBehaviour, IEntity
{
    //This script will keep track of player HP
    public float playerHP = 100;
    public SC_CharacterController playerController;
    public SC_WeaponManager weaponManager;

    public void ApplyDamage(float points)
    {
        playerHP -= points;

        if(playerHP <= 0)
        {
            //Player is dead
            playerController.canMove = false;
            playerHP = 0;
        }
    }
}- Adjunte el script SC_NPCEnemy a la instancia enemiga viva (notará que agregó otro componente llamado NavMesh Agent, que es necesario para navegar por NavMesh)
- Asigne el prefabricado de instancia inactiva creado recientemente a la variable Npc Dead Prefab
- Para Fire Point, cree un nuevo GameObject, muévalo dentro de la instancia del enemigo vivo y colóquelo ligeramente frente a la instancia, luego asígnelo a la variable Fire Point:
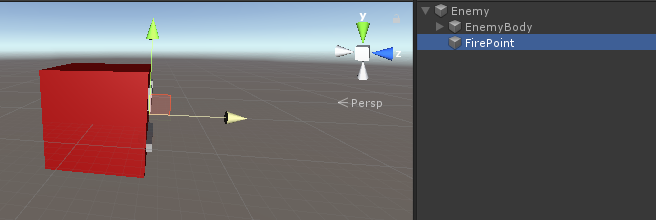
- Finalmente, guarde la instancia viva en Prefab y elimínela de Escena.
Configuración del generador de enemigos
Ahora pasemos a SC_EnemySpawner. Este script generará enemigos en oleadas y también mostrará información de la interfaz de usuario en la pantalla, como HP del jugador, munición actual, cuántos enemigos quedan en una oleada actual, etc.
- Cree un nuevo GameObject y asígnele un nombre "_EnemySpawner"
- Adjunte el script SC_EnemySpawner a él
- Asigne la IA enemiga recién creada a la variable Enemy Prefab
- Asigne la textura de abajo a la variable Textura de punto de mira

- Cree un par de GameObjects nuevos y colóquelos alrededor de la escena, luego asígnelos a la matriz de puntos de generación.
Notarás que queda una última variable por asignar, que es la variable Player.
- Adjunte el script SC_DamageReceiver a una instancia de Player
- Cambie la etiqueta de instancia del jugador a "Player"
- Asigne las variables Player Controller y Weapon Manager en SC_DamageReceiver
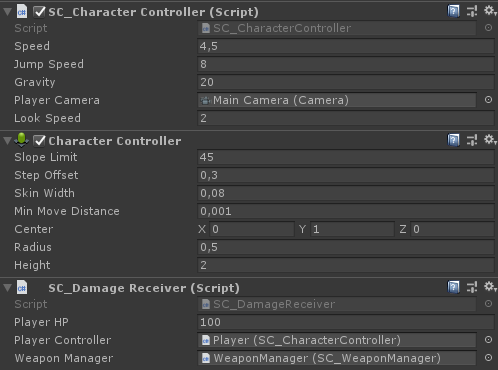
- Asignar instancia de jugador a una variable de jugador en SC_EnemySpawner
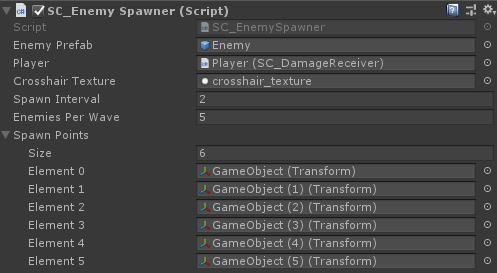
Y, por último, tenemos que hornear NavMesh en nuestra escena para que la IA enemiga pueda navegar.
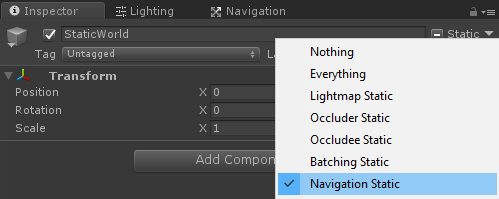
Además, no olvide marcar cada objeto estático en la escena como estático de navegación antes de hornear NavMesh:
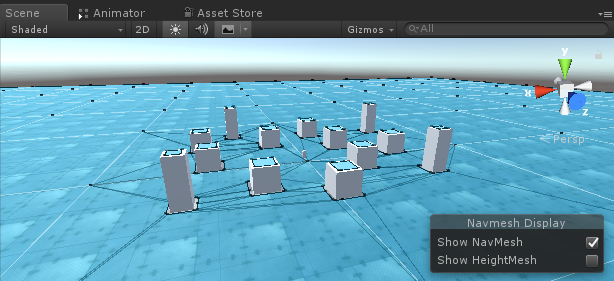
- Vaya a la ventana NavMesh (Ventana -> AI -> Navegación), haga clic en la pestaña Hornear y luego haga clic en el botón Hornear. Después de hornear NavMesh, debería verse así:
Ahora es el momento de presionar Play y probarlo:
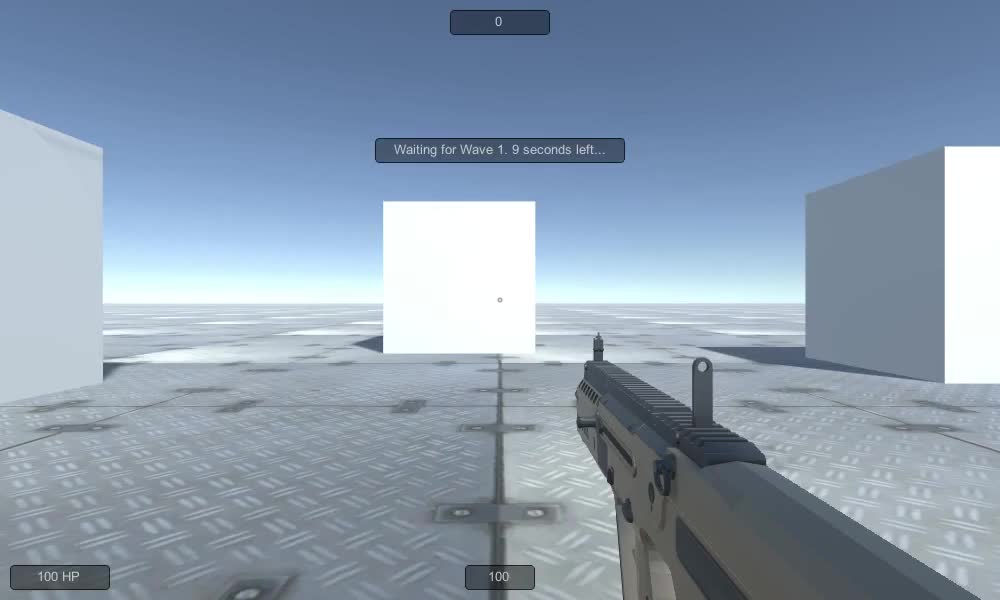
¡Todo funciona como se esperaba!